
We know that sometimes inconveniences can arise. Therefore, we have created this step-by-step guide to solve the most common errors as quickly as possible. You just have to follow the steps mentioned, we have included images to facilitate solving the problem.
In order to access the "Installation Guide" follow the steps below:
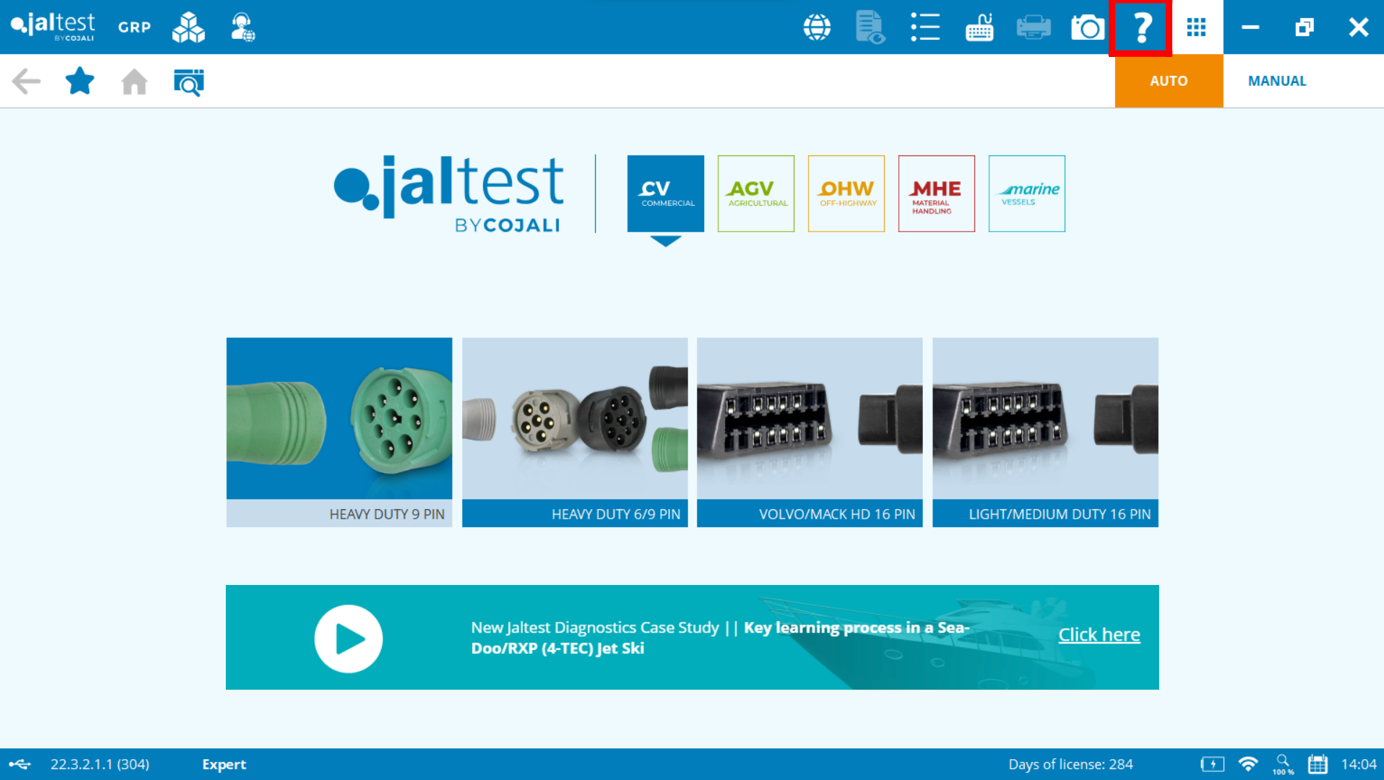
1. Click on "Help Menu".
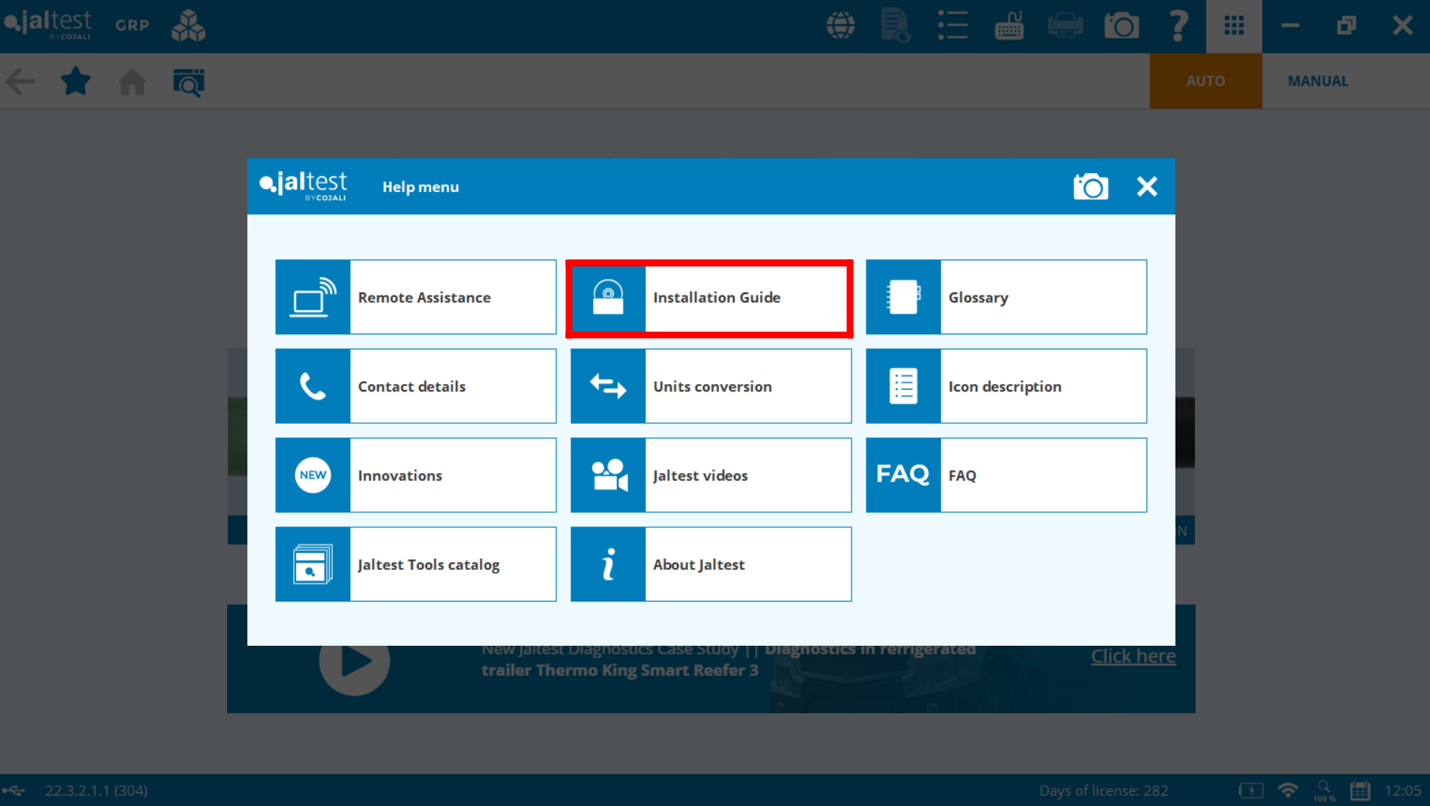
2. Click on "Installation Guide"
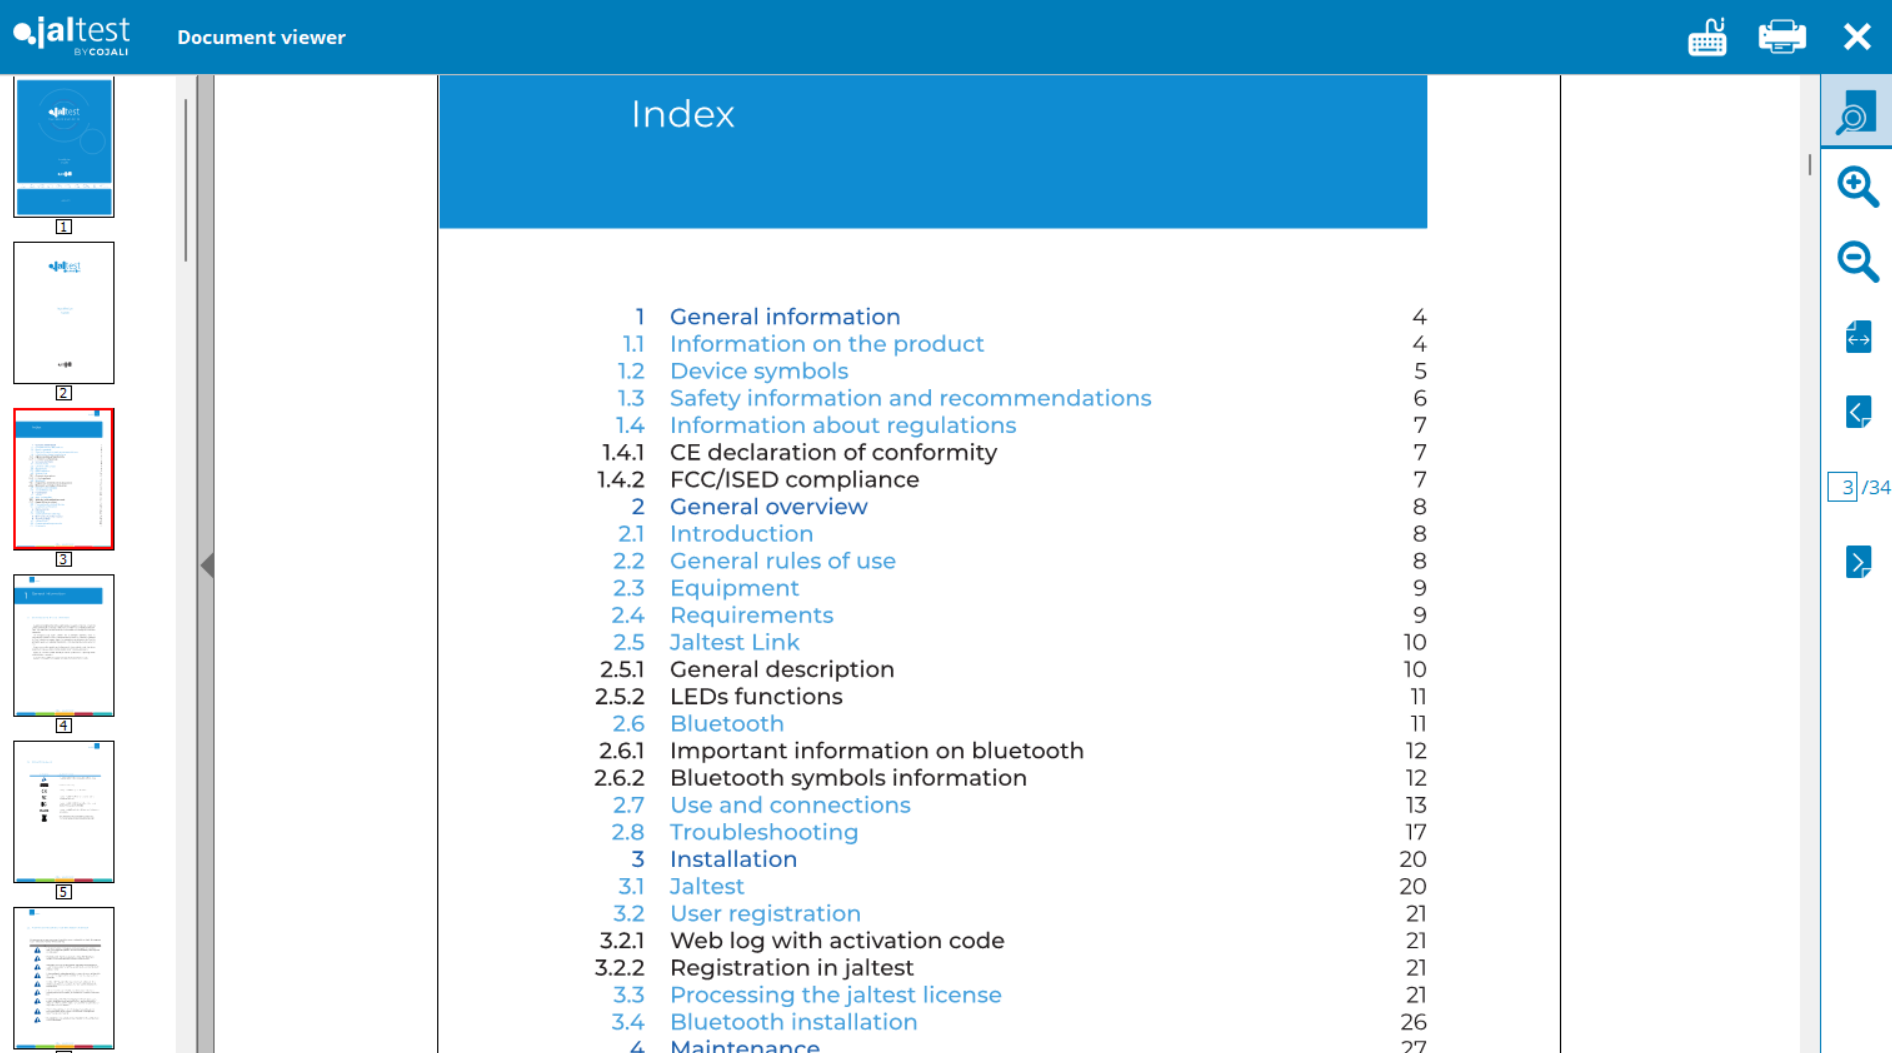
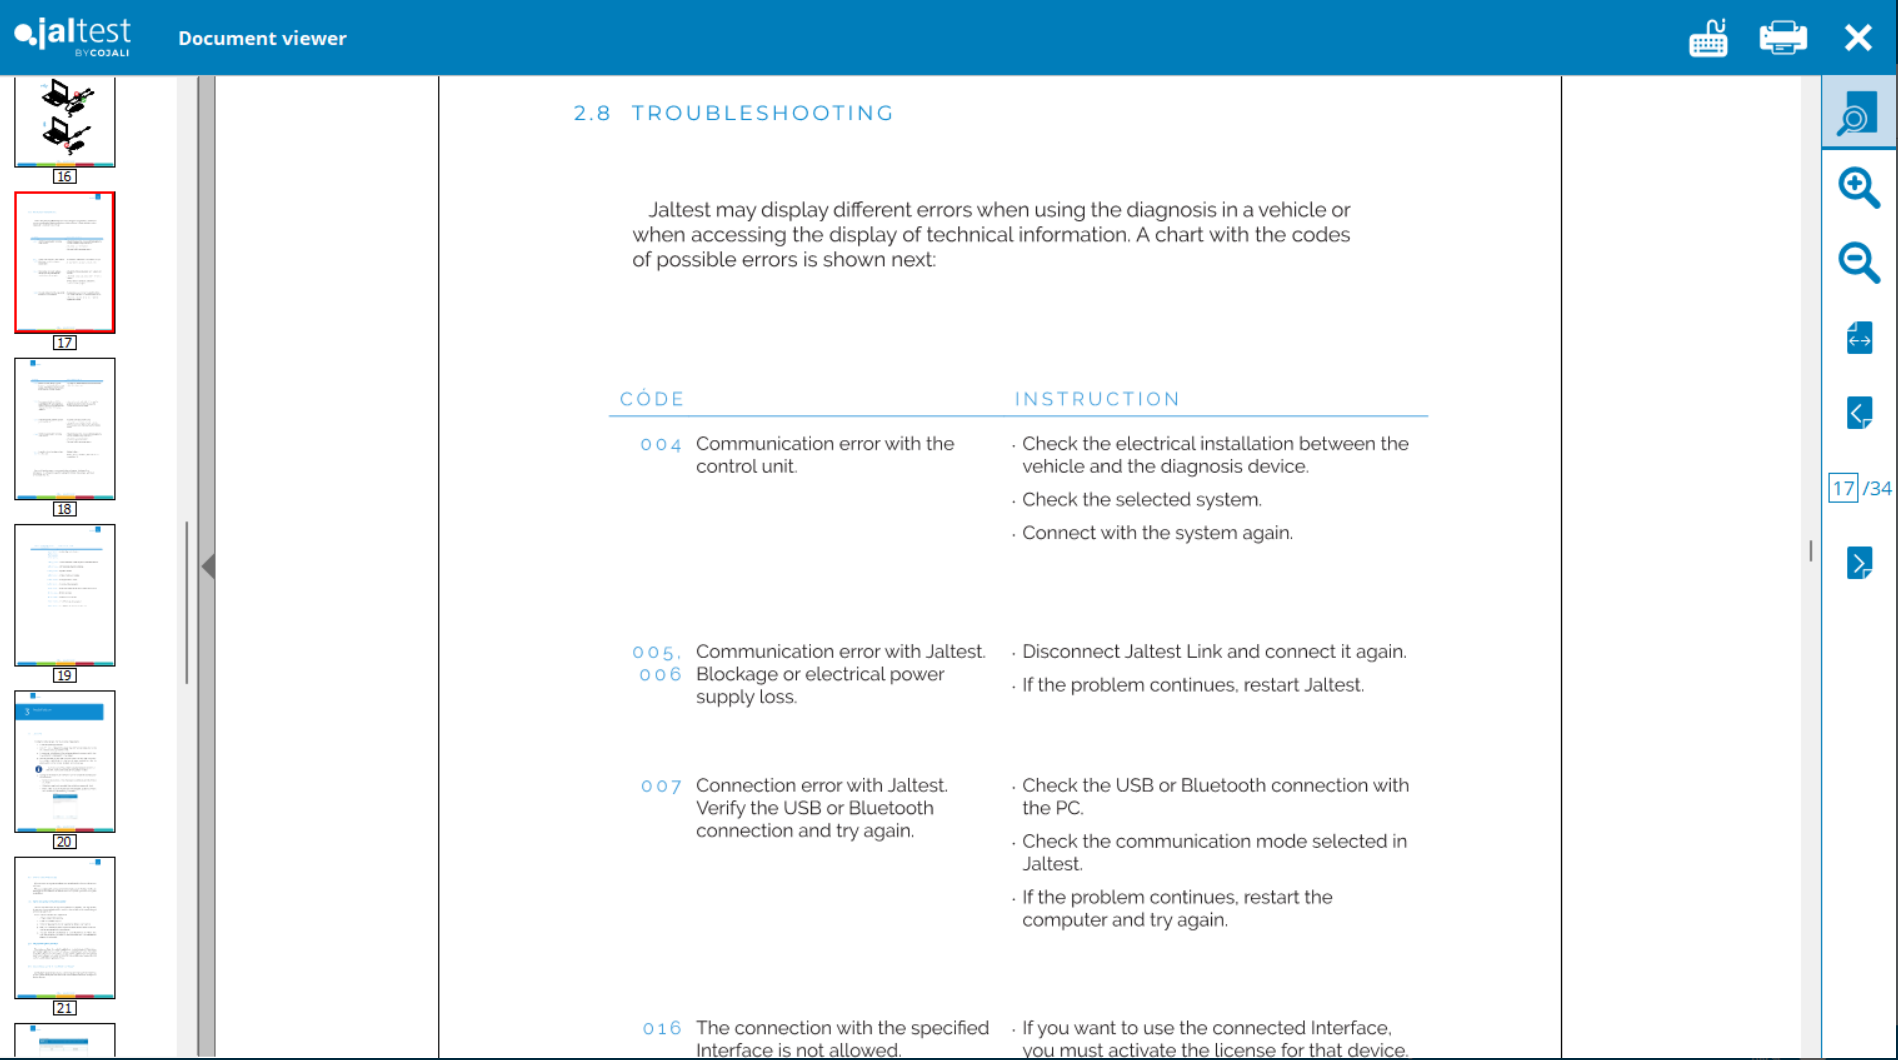
3. You will be able to access general product information through "Index", if you need to check information related to software error codes, please check page 17.
After you have followed all the steps in this guide, the issue should be fixed and you are ready to continue using Jaltest.
Remember that to access certain technical support functions a Jaltest ATS license is required.

We know that sometimes inconveniences can arise. Therefore, we have created this step-by-step guide to update Jaltest as quickly as possible. You just have to follow the steps mentioned, we have included images to facilitate solving the problem.
*You need to have an active license to update your software and internet access.
*If you don't know how to check your license expiration date; follow the link below for instructions
CHECKING MY LICENSE EXPIRATION DATE
*You may as well send us an email to customersupport@jaltest.com including your Jaltest serial number our team will check the expiration date for you. If it is expired, reach out to your Jaltest distributor to renew it before continuing.
*Plug in your Jaltest link by USB to the laptop.
*You can also download the Full version of the Software (Download Manager) available in the “Update Area” of your “Client Access”.
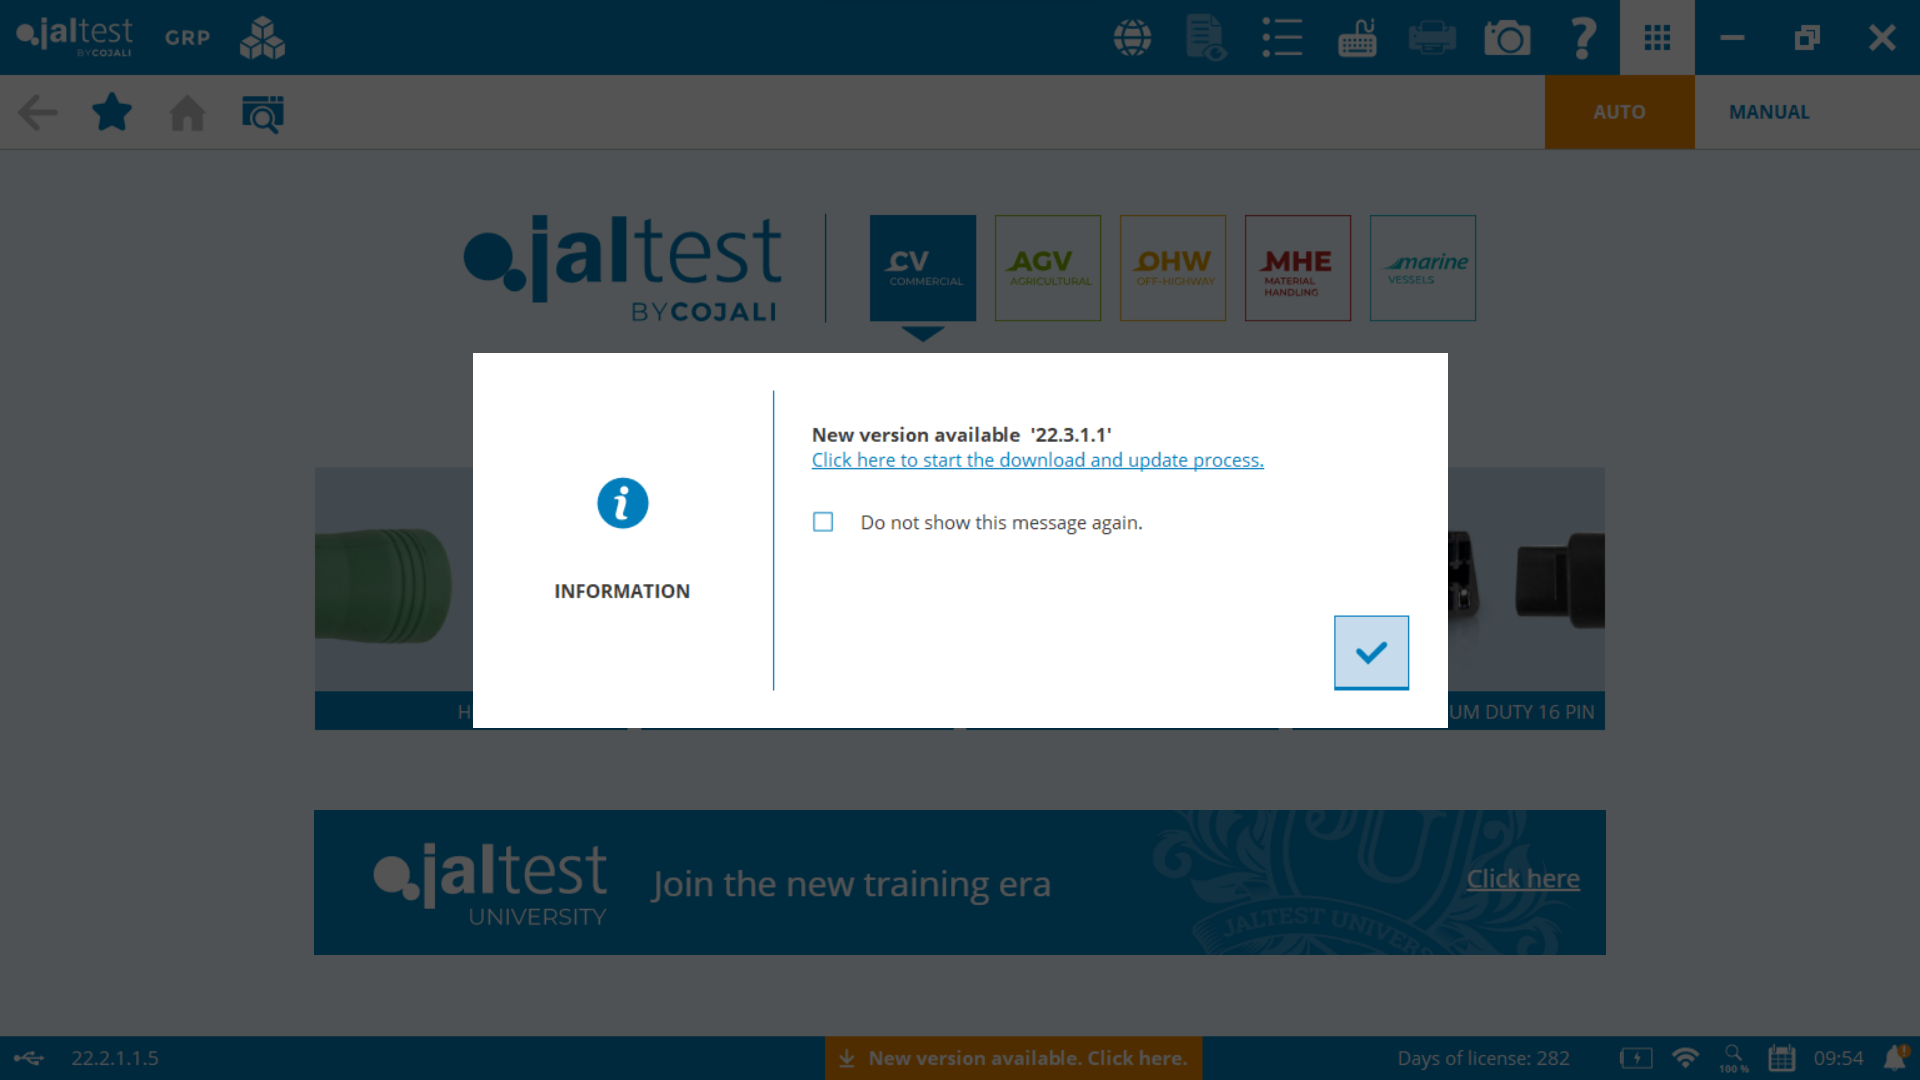
1. The “New version available” message will show on your current Software whenever there is a new version available. You need to download the software and follow the steps provided.
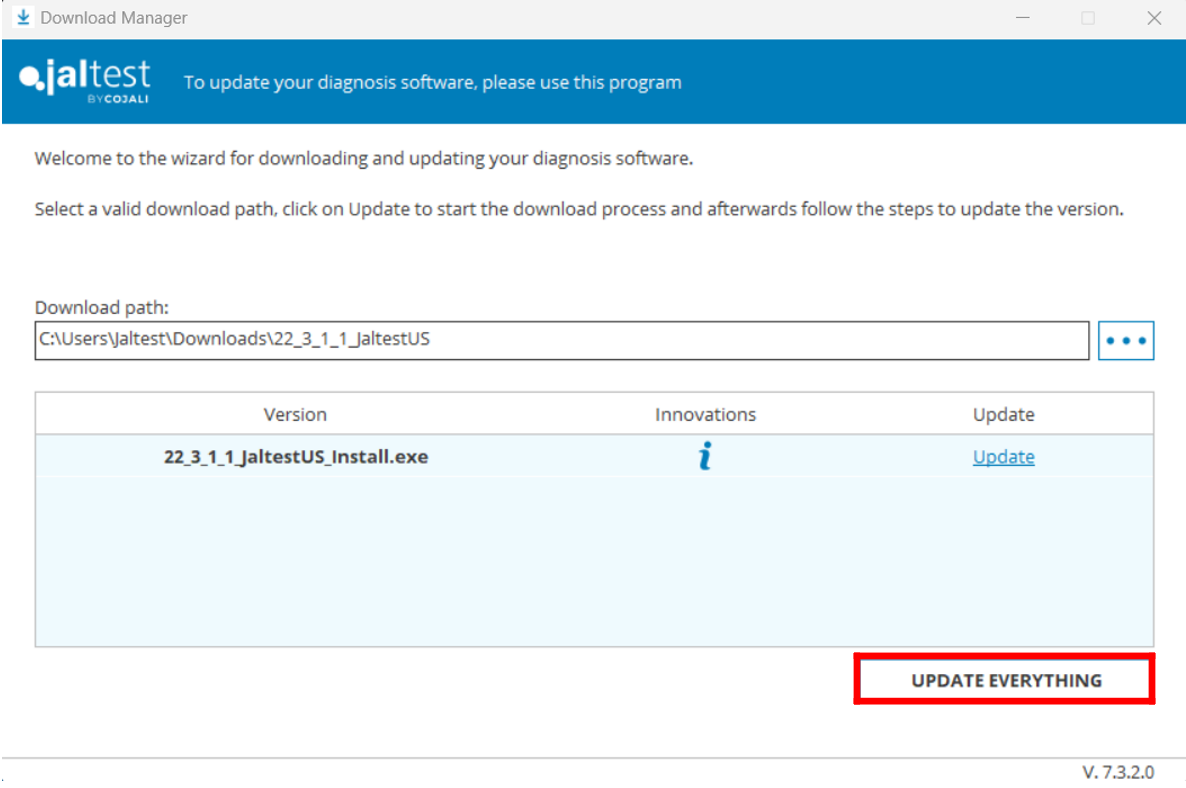
2. Once you have completed the download, you need to click "Update everything".
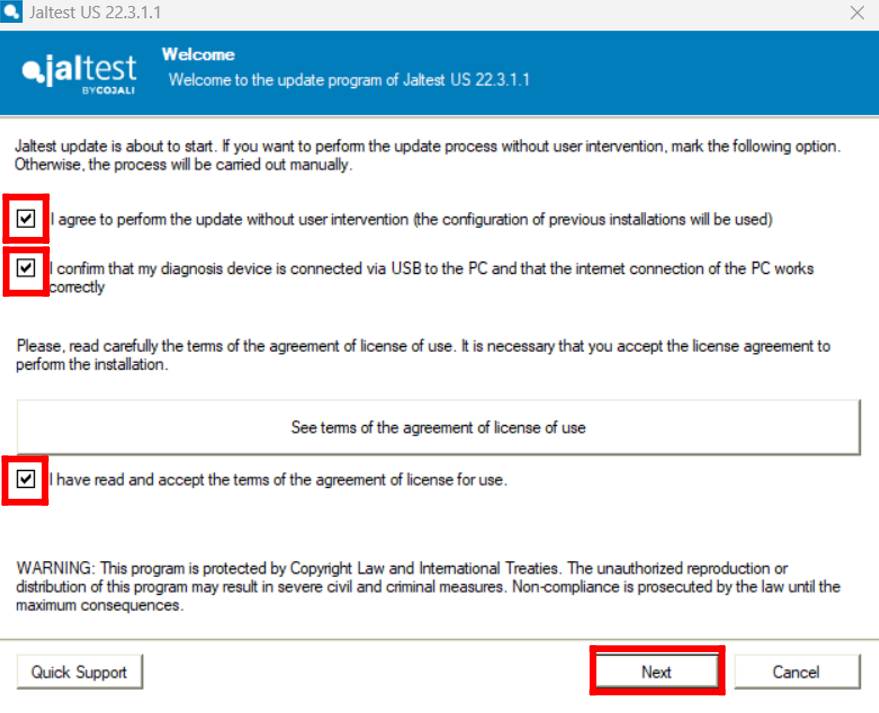
3. Follow the prompts and leave the Jaltest unit plugged in by USB and laptop connected to the internet.
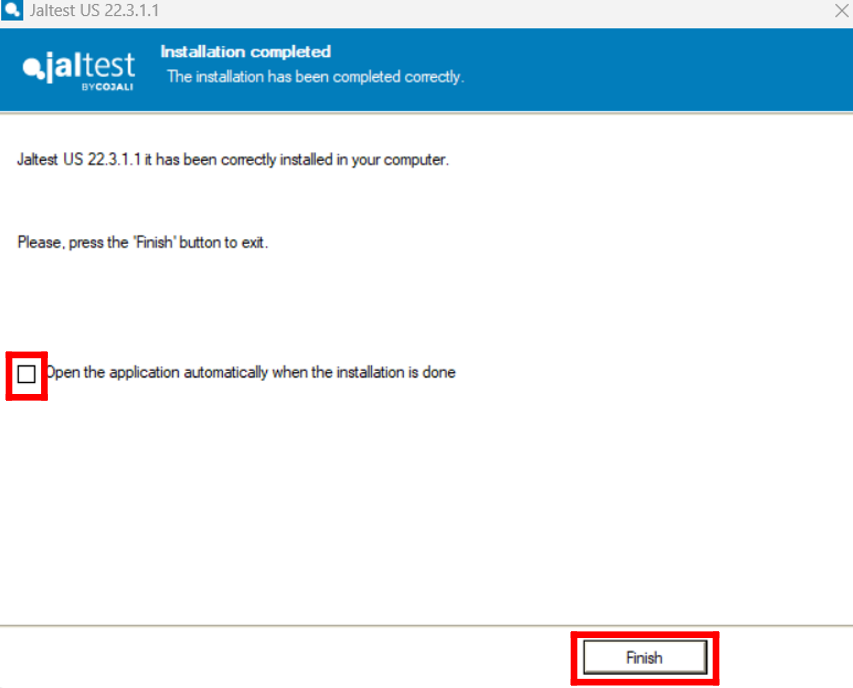
4. Once the Application Configuration is complete, you may check the box to open the software and hit "Finish".
5. Congratulations! You have updated your Jaltest software.
After you have followed all the steps in this guide, the issue should be fixed and you are ready to continue using Jaltest.
Remember that to access certain technical support functions a Jaltest ATS license is required.

We know that sometimes inconveniences can arise. Therefore, we have created this step-by-step guide so can install the software as quickly as possible. You just have to follow the steps mentioned, we have included images to facilitate solving the problem.
You may install Jaltest software on up to three different laptops, however, you will be able to only use one at a time.
A. You need to have an active license to install the software and connection to the internet.
If you don't know how to check your license expiration date; follow the link below:
CHECK EXPIRATION DATE FOR JALTEST UNIT
Or send us an email to customersupport@jaltest.com including your Jaltest serial number our team will check the expiration date for you. If it is expired, reach out to your Jaltest distributor to renew it before continuing.
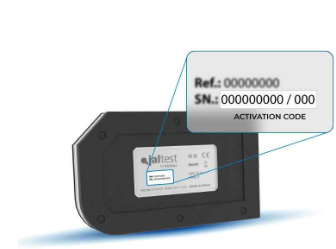
You may find your serial number on the back of your Jaltest unit
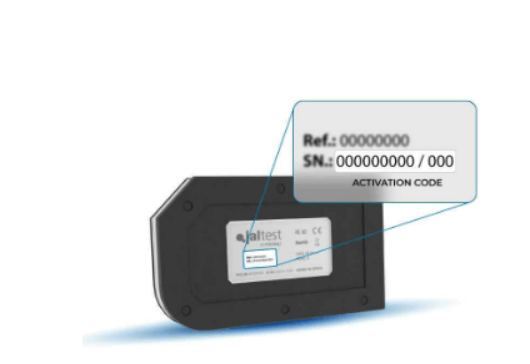
B. Jaltest link must be plugged in by USB to the laptop.
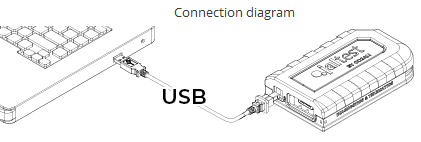
C. You need to have your Jaltest username and password from your "Client Area" to download the software.
If you don't have access to your Jaltest.com account, check this article for help:
CHANGE EMAIL FOR JALTEST ACCOUNT
Steps:
1. You need to log in to your Jaltest account to download the software.
Log in: HERE
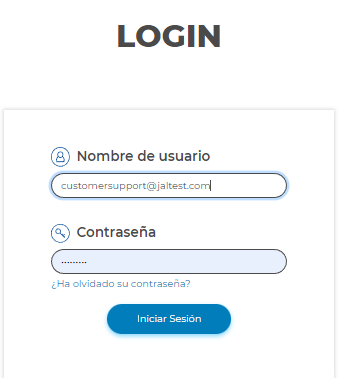
Once you log in, get Download Manager by clicking "Update Area" on Jaltest.com:
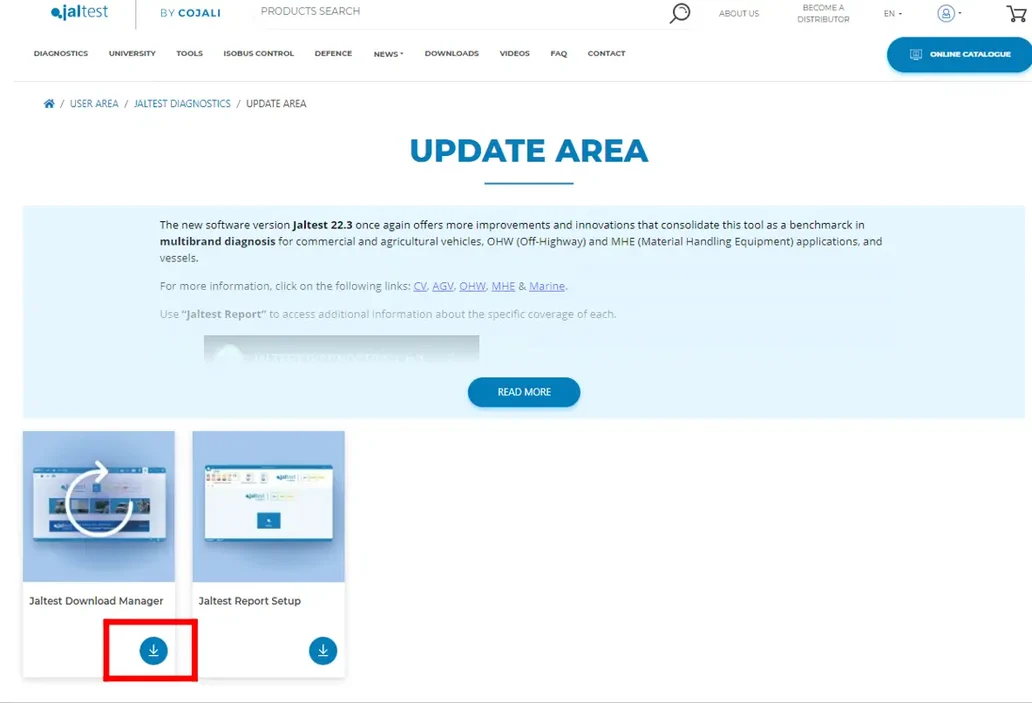
2. Once you get the "Download Manager"
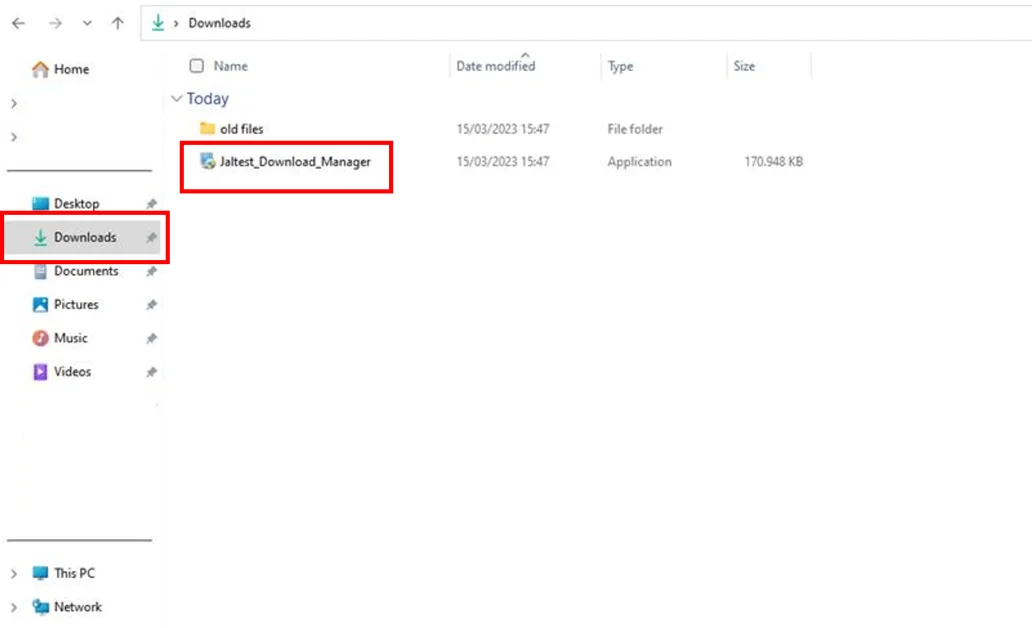
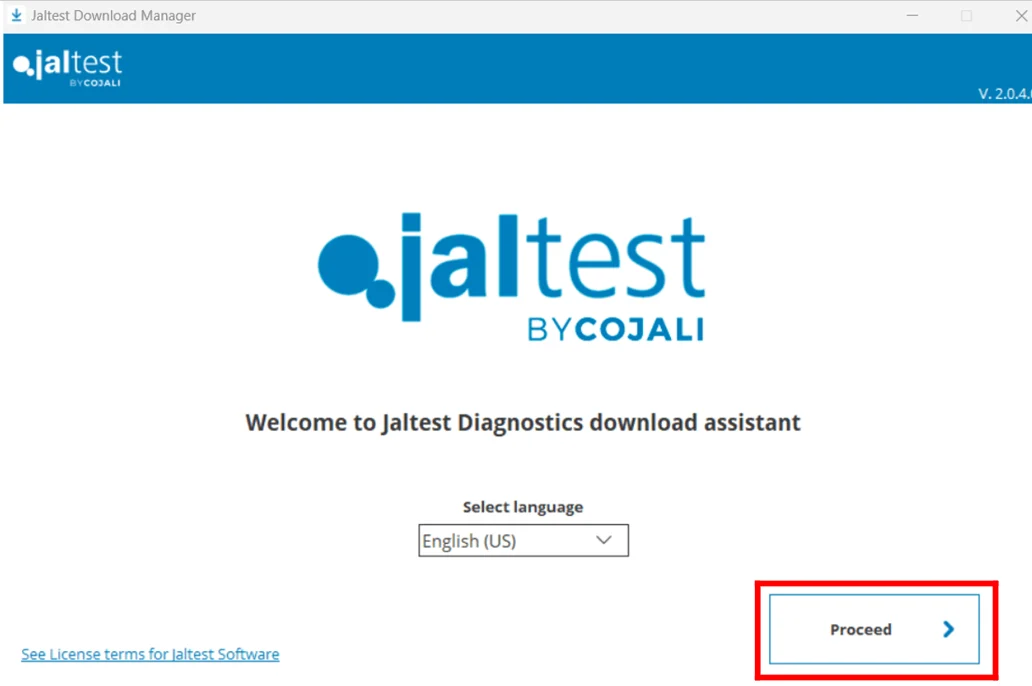
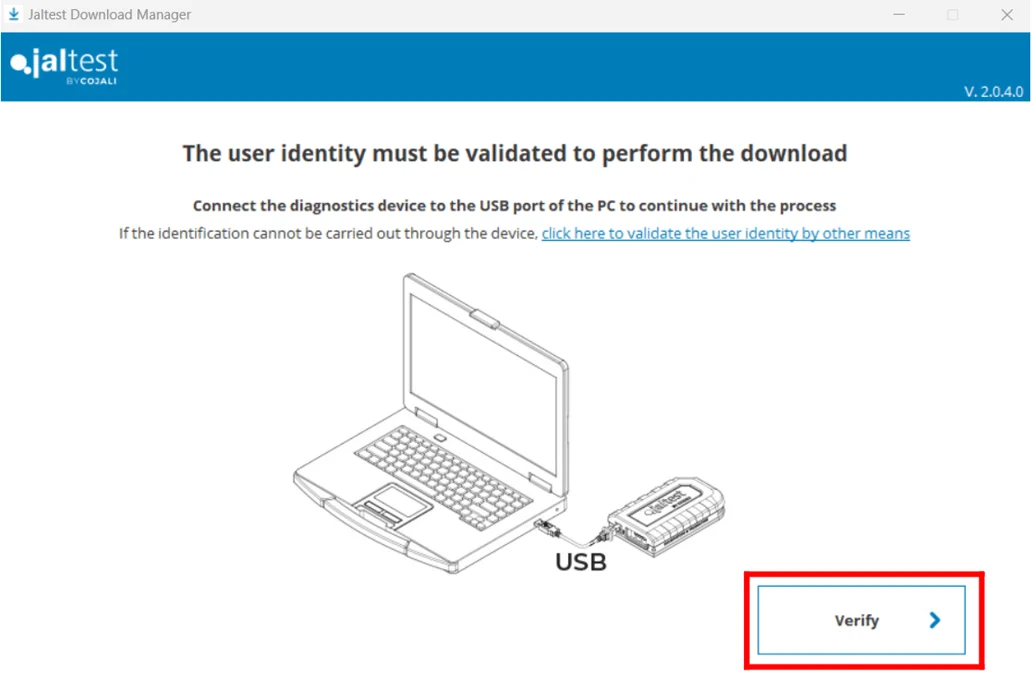
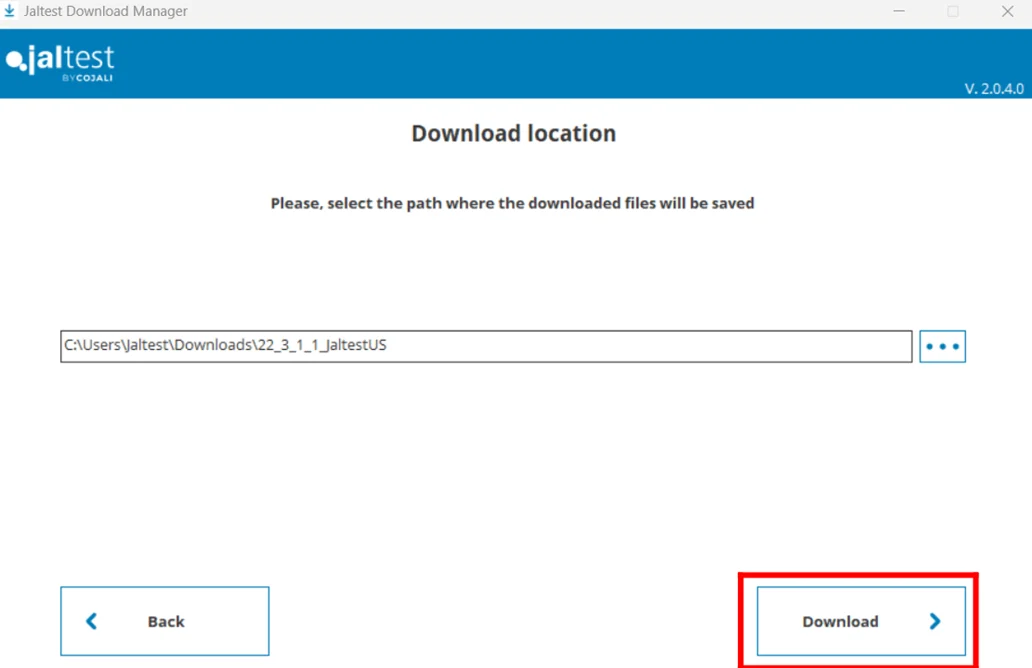
Go to Downloads on your laptop. Right-click on it and select "Run as Administrator" and follow the prompts to start the download.
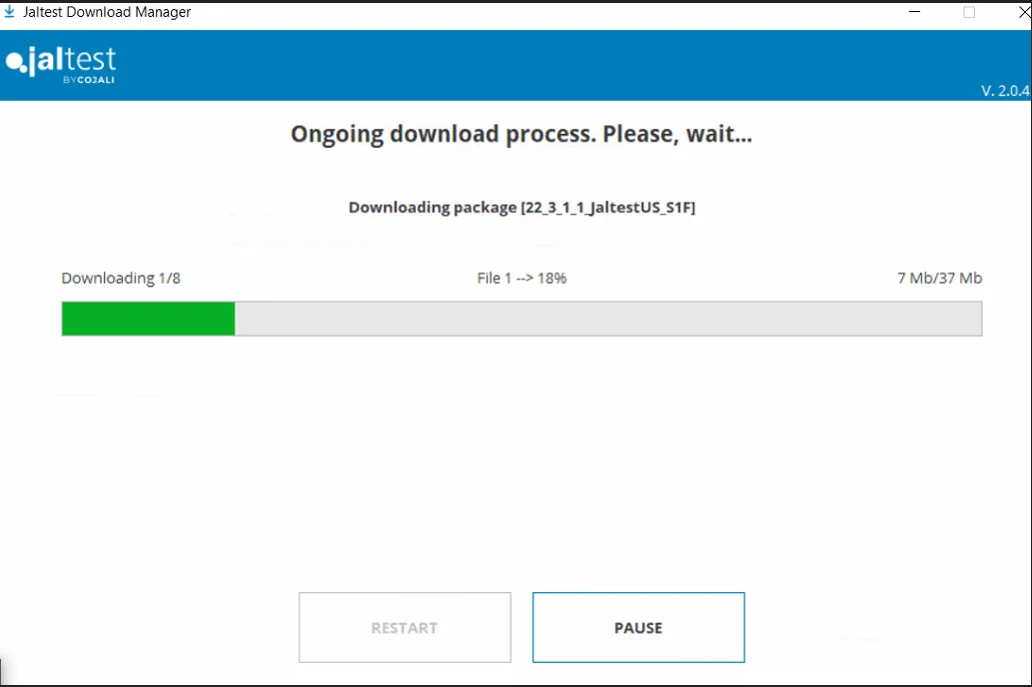
3. Once the software is downloaded, click "Install" to start the installation process.
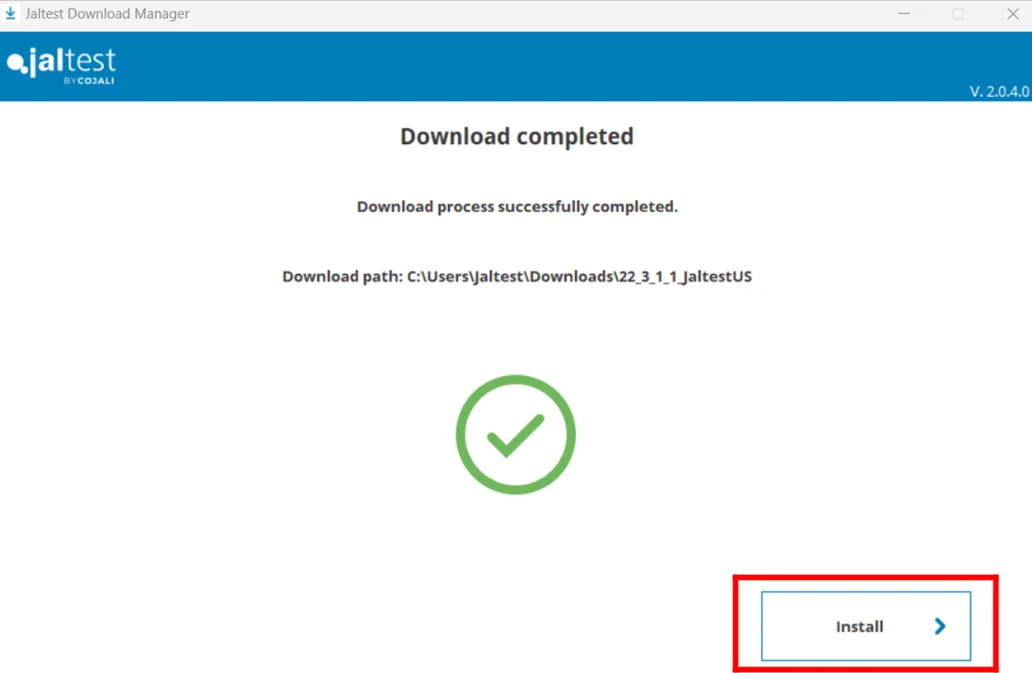
4. Follow the prompts by checking the boxes and clicking next.
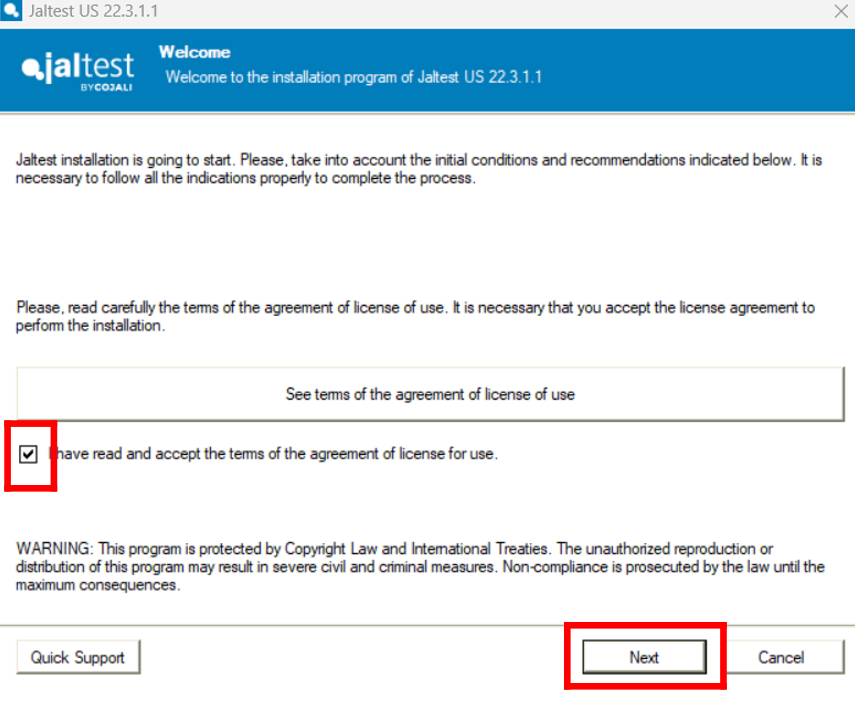
5. Click "Next" to all prompts in the installation setup.
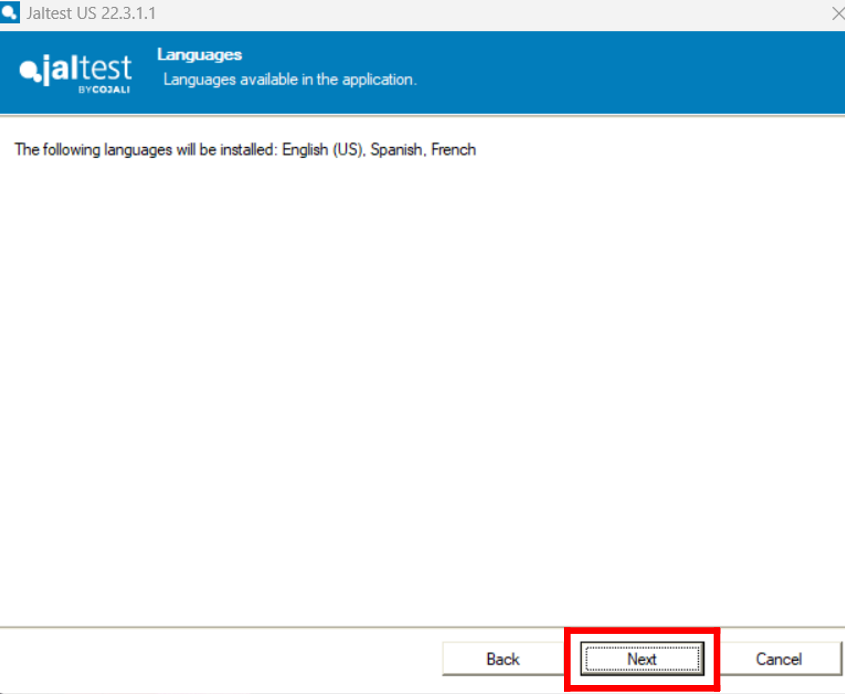
6. Select "Complete Installation"
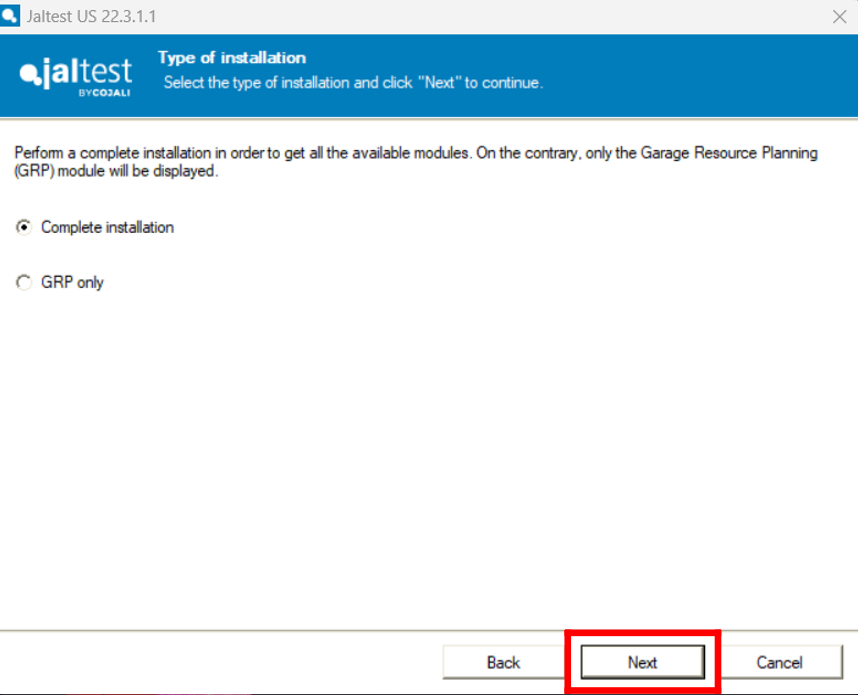
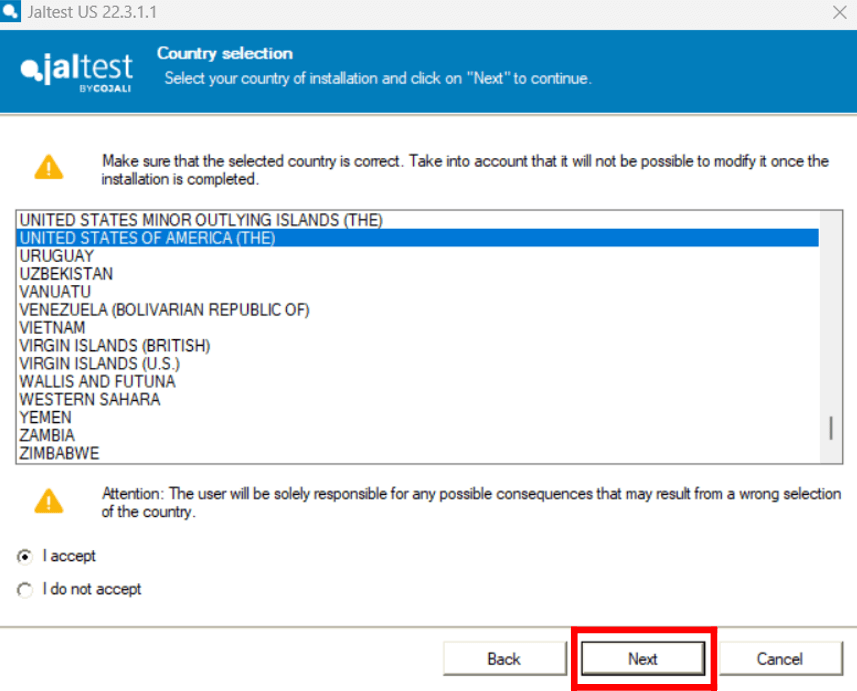
7. Select your installation country, accept and click "Next" to all prompts to continue.
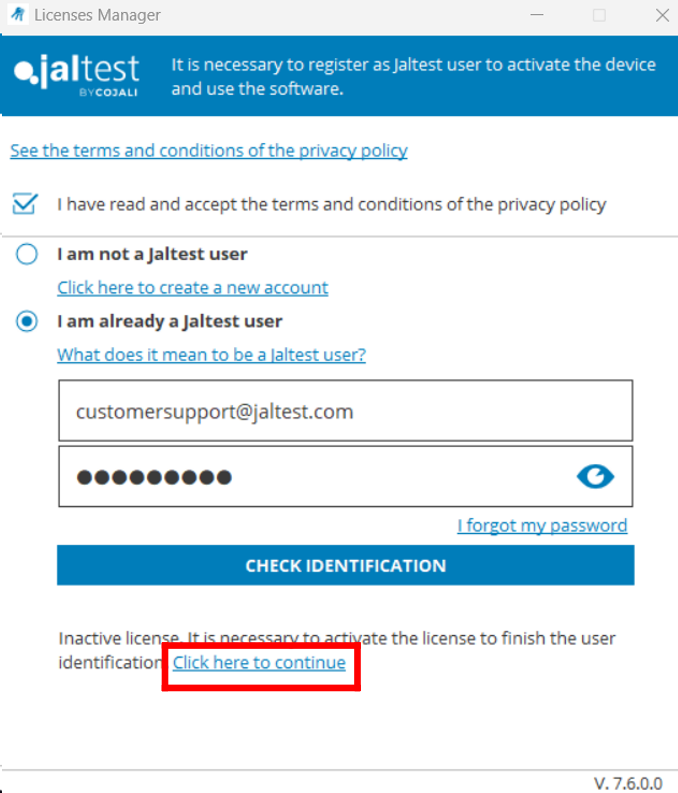
8. Accept "Terms and conditions" then select " I am already a Jaltest user" and use your login information for Jaltest.com "Client Area"
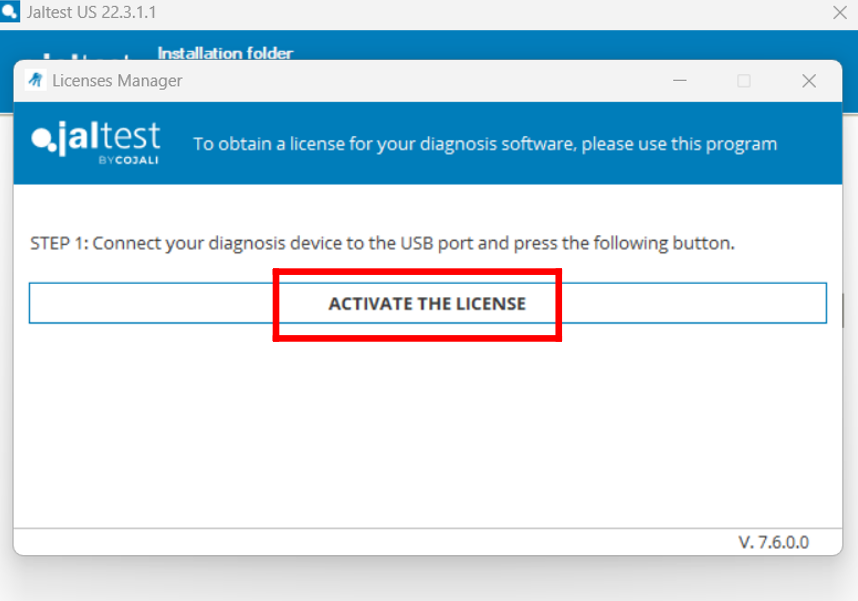
9. Click "Activate License". Once it activates the license the software configuration will start.
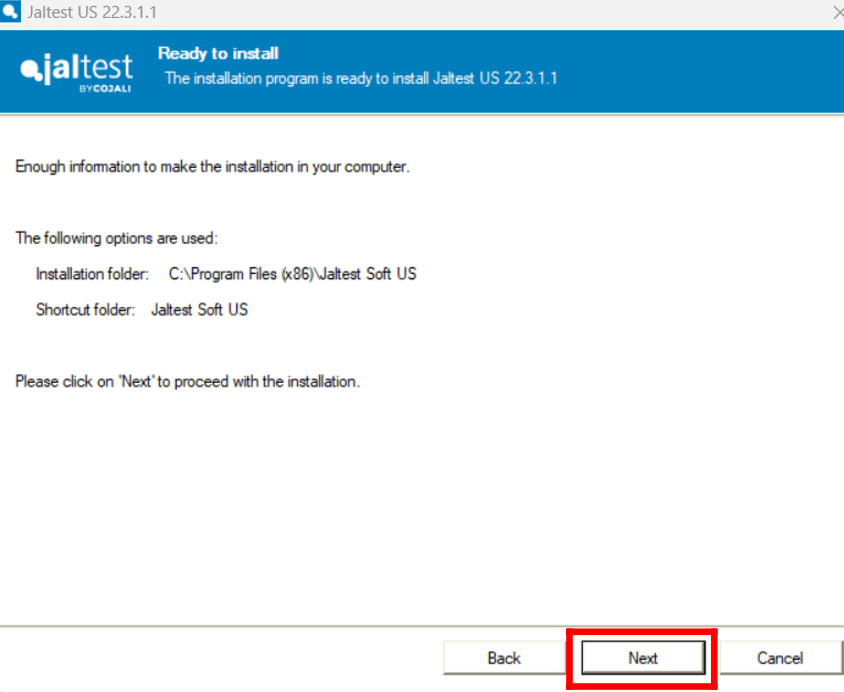
10. Leave the Jaltest link plugged in by USB to the laptop with access to internet so your unit will be configured properly. Once the configuration has been performed, you may just select "Do not use wizard".
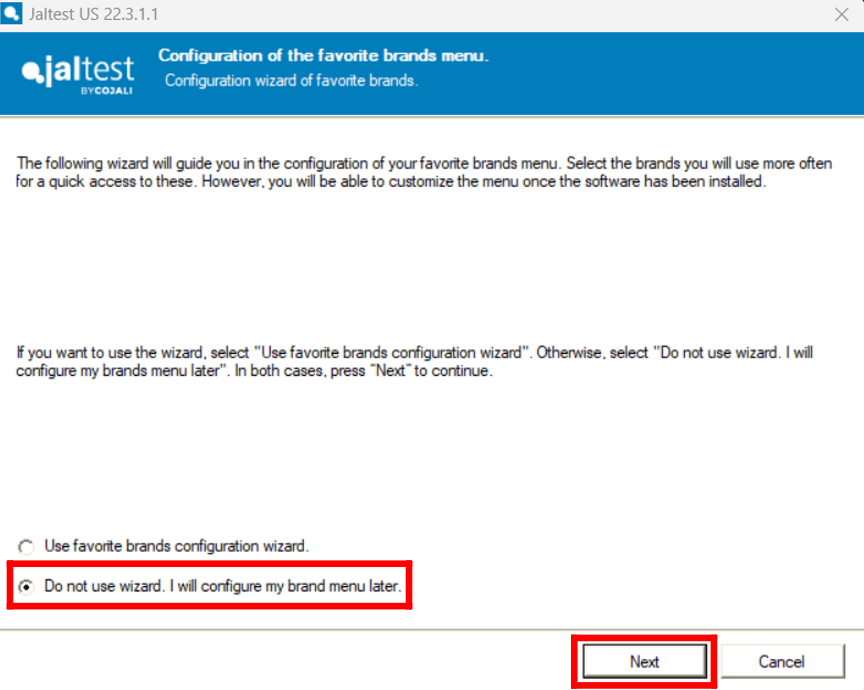
11. Check the box and hit "Finish" and you have installed the software.
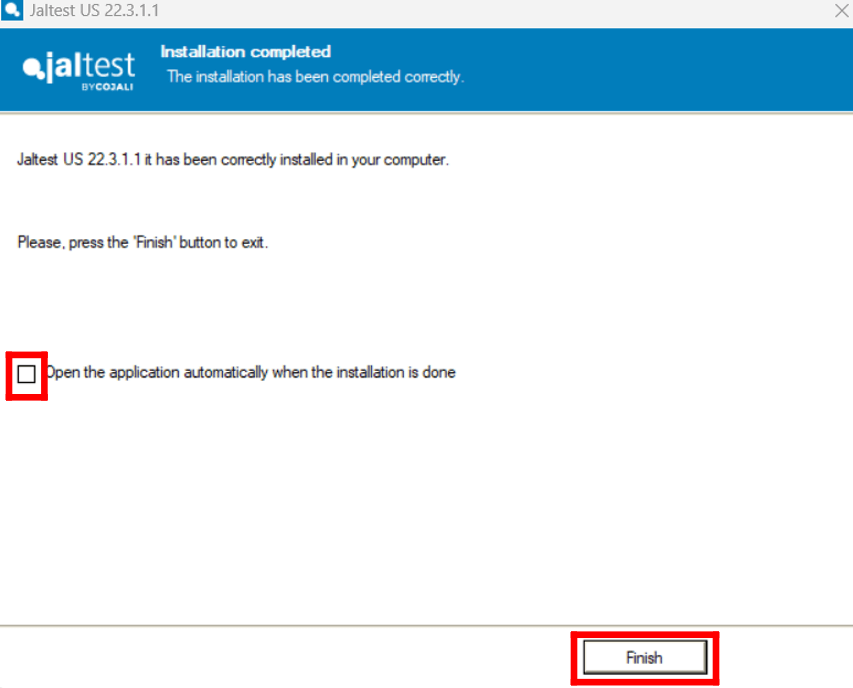
12. You are all set and can start using the device! however, before using it, make sure you set up your Expert Mode as well so you can perform regens, parameter changes, calibrations, and more advanced actions!
Use this article for help setting up your "Expert Mode"

We know that sometimes inconveniences can arise. Therefore, we have created this step-by-step guide to change the email associated with your Jaltest account. You just have to follow the steps mentioned, we have included images to facilitate solving the problem.
1. Register a new Jaltest account on our website:
REGISTER A NEW JALTEST ACCOUNT
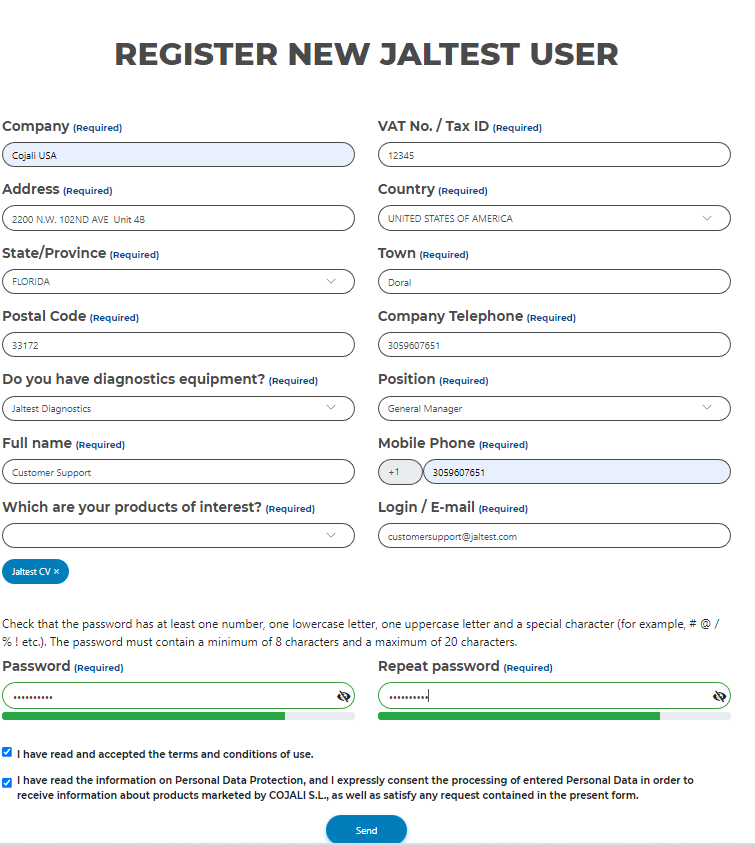
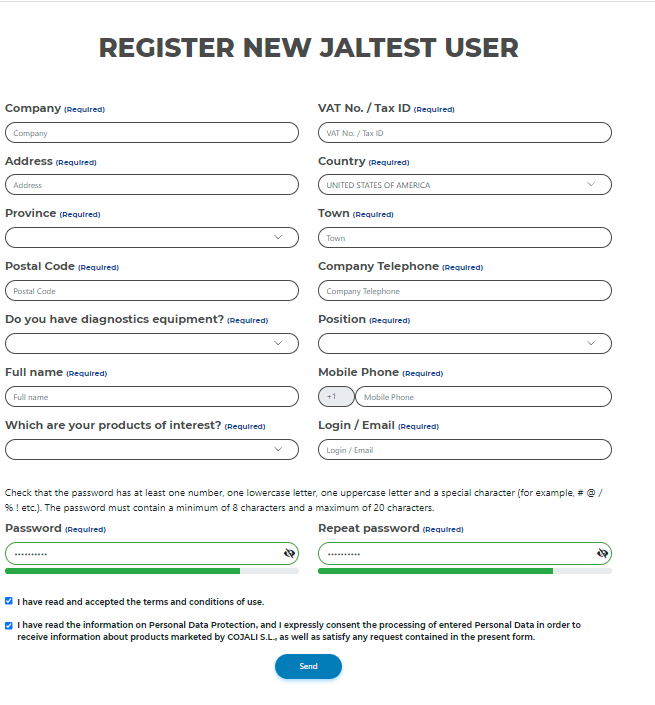
2. Complete the registration form, and fill out all the necessary information.
3. Set up a password for your new account.
4. Accept the terms and conditions and click "Send"
5. Once you complete the registration process, send us an email to: customersupport@jaltest.com including your Jaltest serial number, company name, and new email used in the registration.
6. Our customer support team will process the account change and notify you once it has been done so you can access your "Client Area"
After you have followed all the steps in this guide, the issue should be fixed and you are ready to continue using Jaltest.
Remember that to access certain technical support functions a Jaltest ATS license is required.

Jaltest Diagnostics GRP is the ideal solution for small, medium, and big workshops, thanks to the different modes that it includes and that can be activated free of charge according to your needs.
In order to enable GRP enterprise you need to follow these steps:
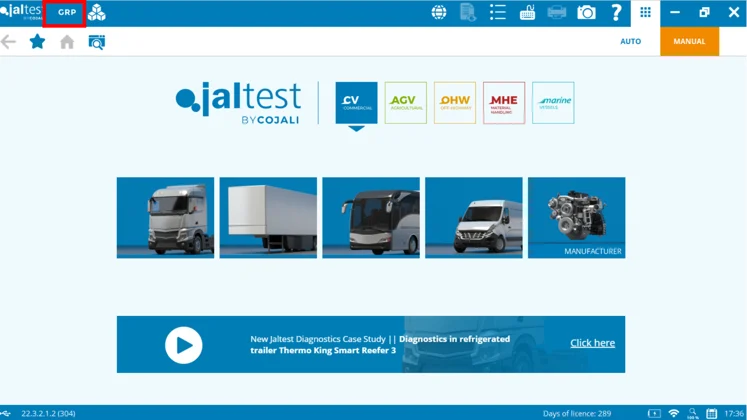
1. Click on the GRP icon you have on the top left corner in Jaltest software:
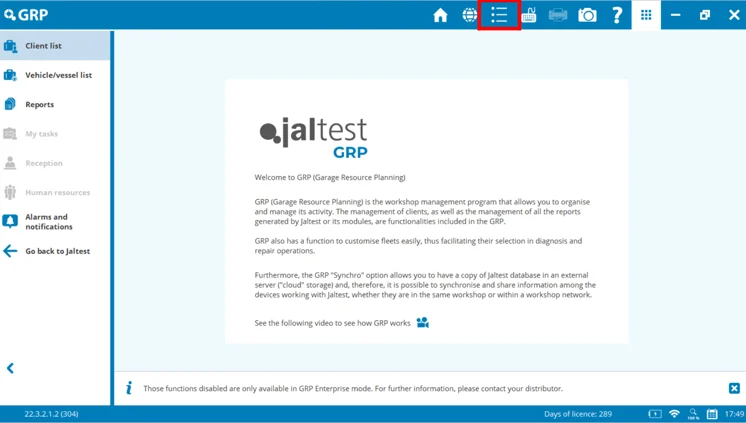
2. Access: Preferences/ Main Menu.
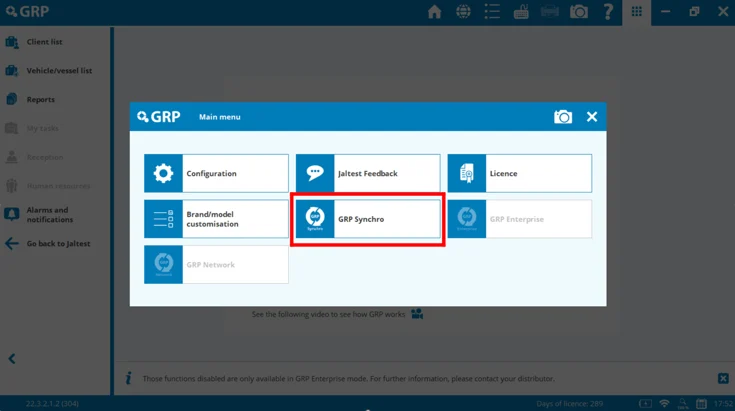
3. Click "GRP Synchro"
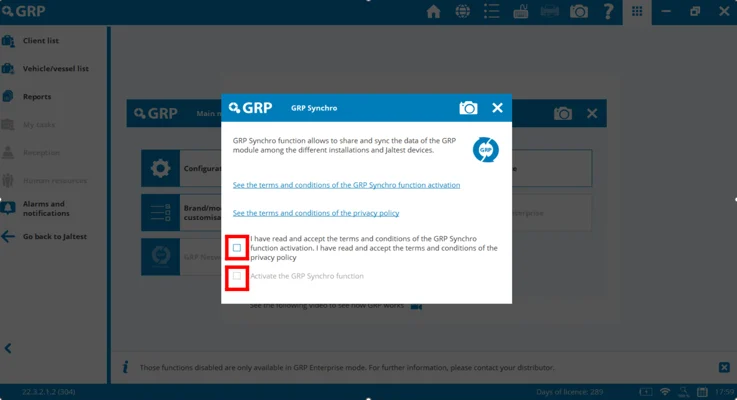
4. Activate GRP Synchro.
5. After activating GRP Synchro, access "Human Resources" and click next on the Activation Wizard:
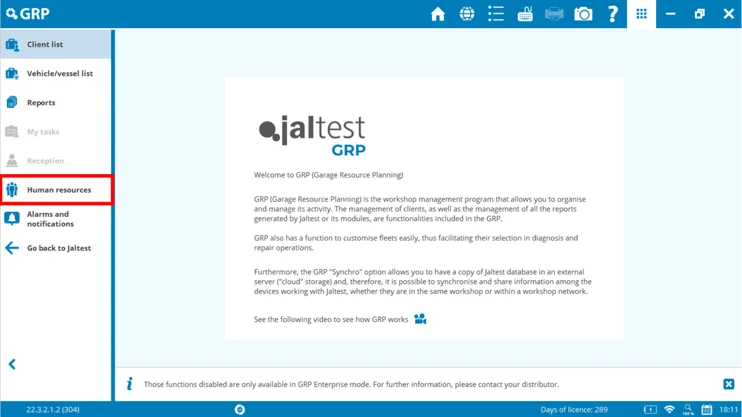
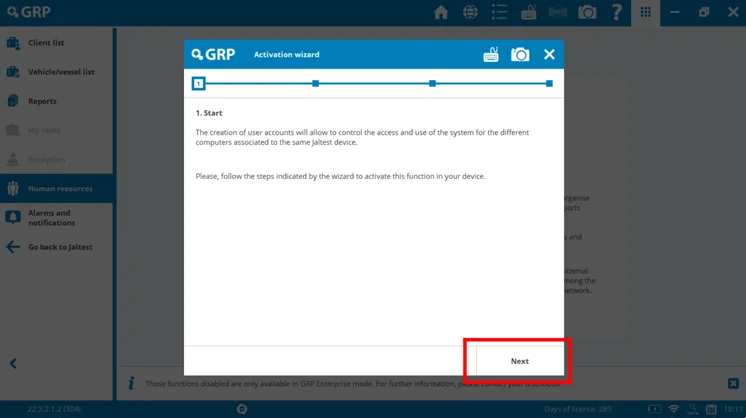
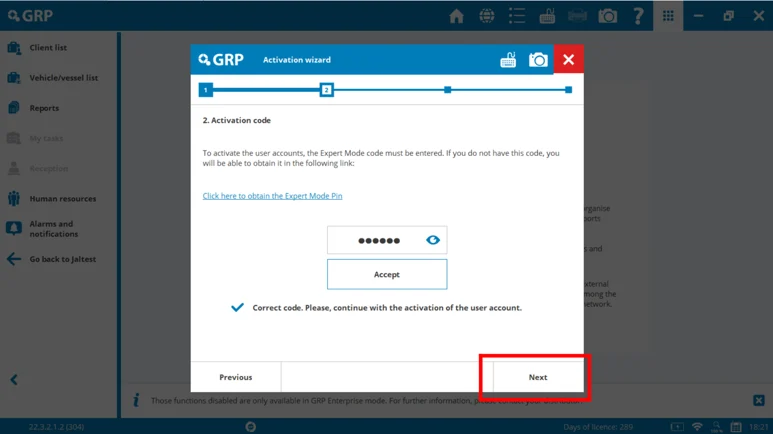
6. You need to type in your expert mode and hit "Next":
*If you need to obtain expert mode use this article for help:
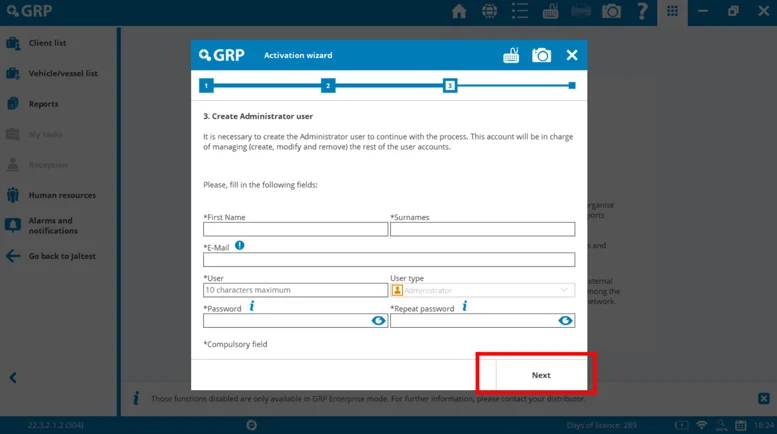
7. Next, you will create your Administrator user for GRP Enterprise. Please, fill in all the necessary information and make sure you save your username and password, then click "Next".
8. You will be sent an activation code to the email set up as the Administrator user for GRP. Check your email and enter the code to continue with the process, click "Create Admin user"
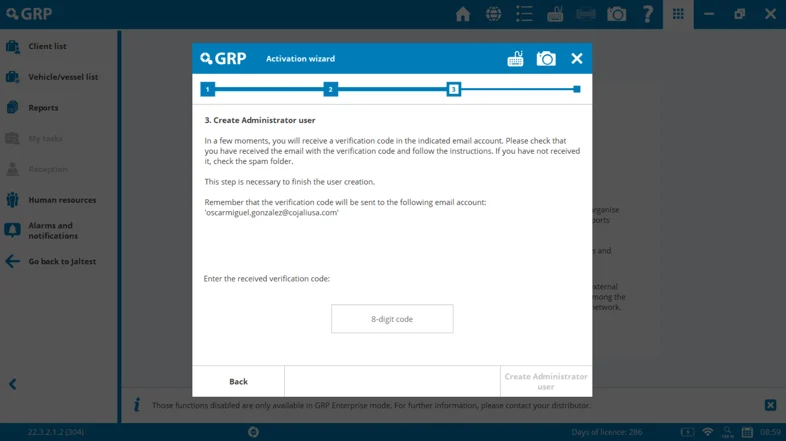
9. Follow all instructions provided in the software to continue with the setup, click "Finish"
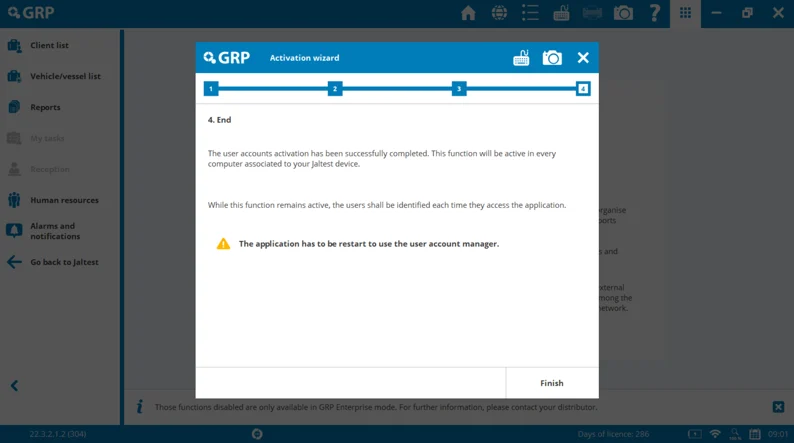
10. Once the application restarts, you will be prompted to enter your GRP user and password, please sign in:
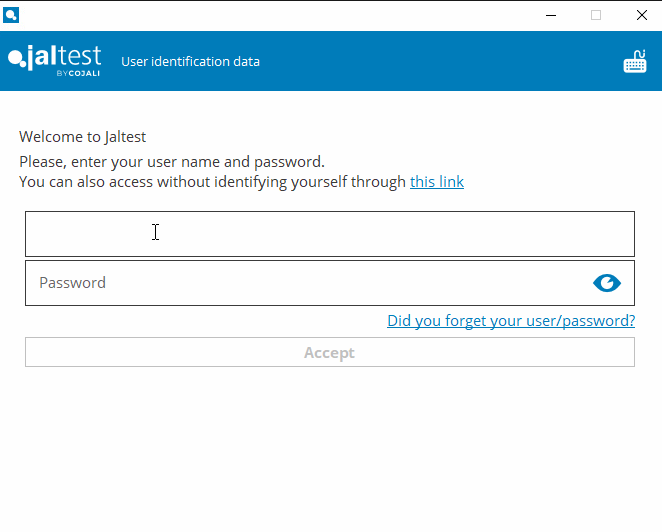
11. Once you have signed in to the software. You need to access GRP.
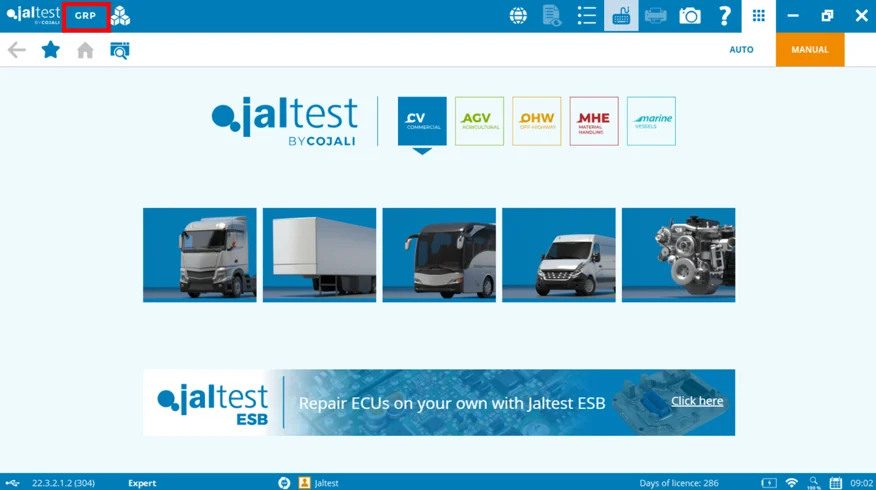
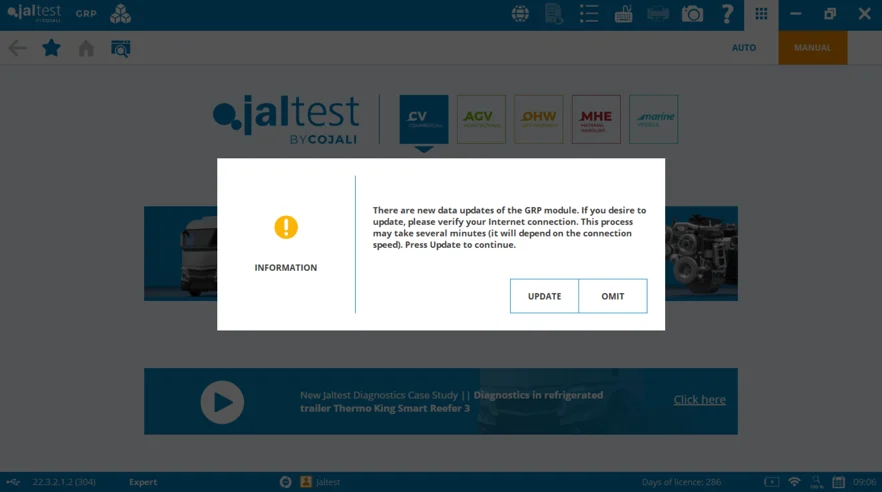
12. Follow all instructions provided in the software and "Click Update".
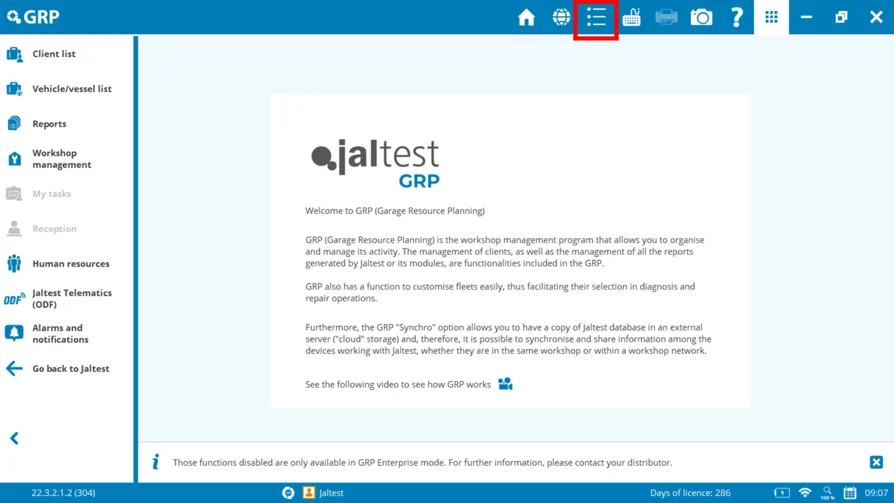
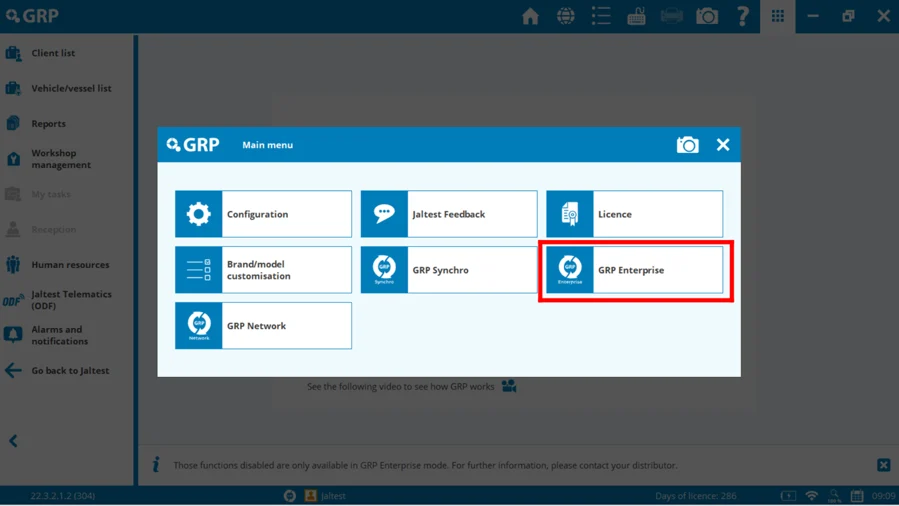
13. Once you have accessed GRP, go to Preferences/ Main Menu and then click GRP Enterprise:
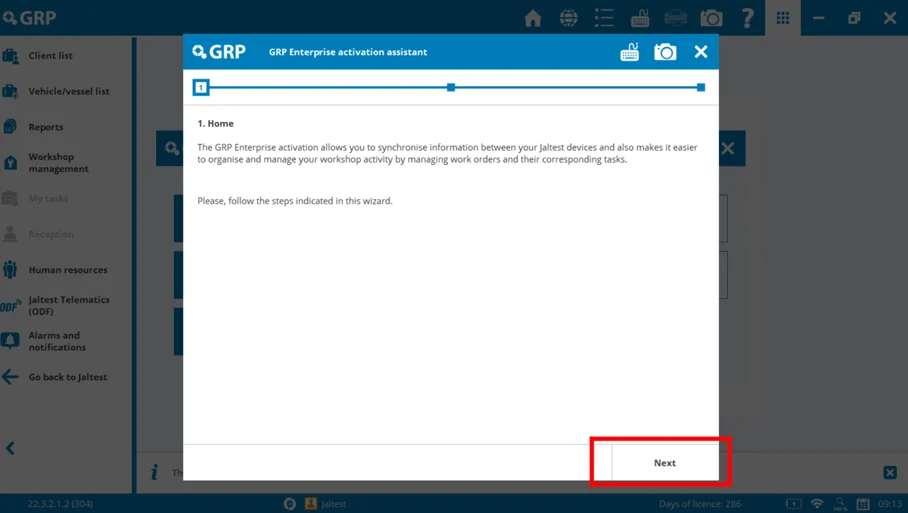
14. Follow all steps in the software by clicking "Next" and create a name for your GRP Enterprise. Include as well the email you have for the GRP admin account next to the serial number and click next.
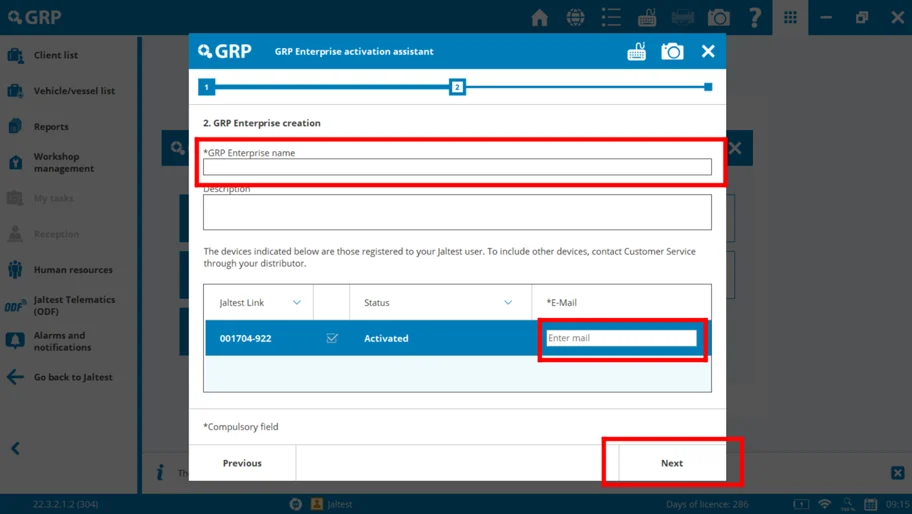
15. Follow all indicated steps in the software to finish the GRP Enterprise creation.
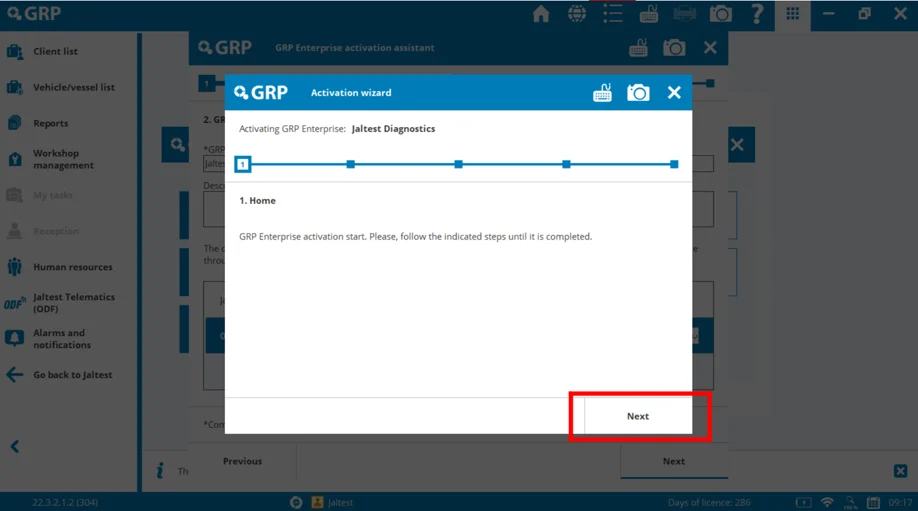
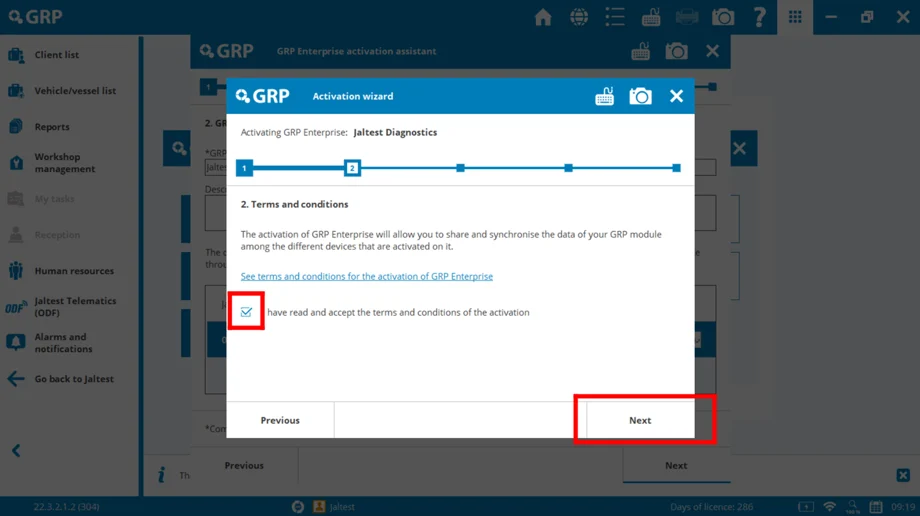
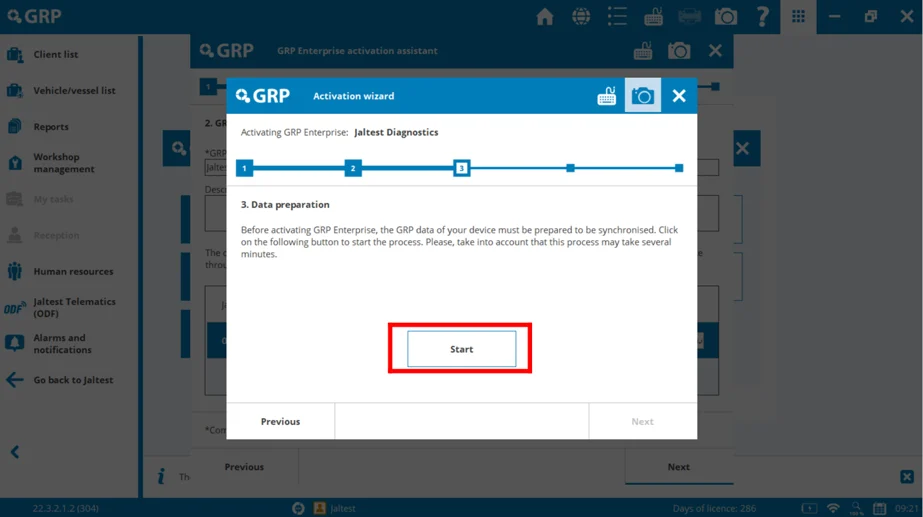
16. Click next in every step as indicated in the software and click Start to synchronize GRP.
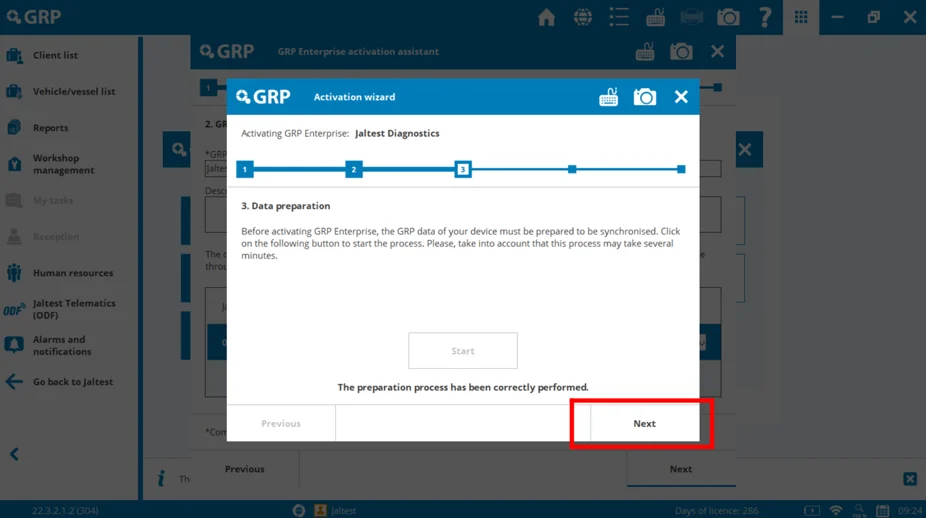
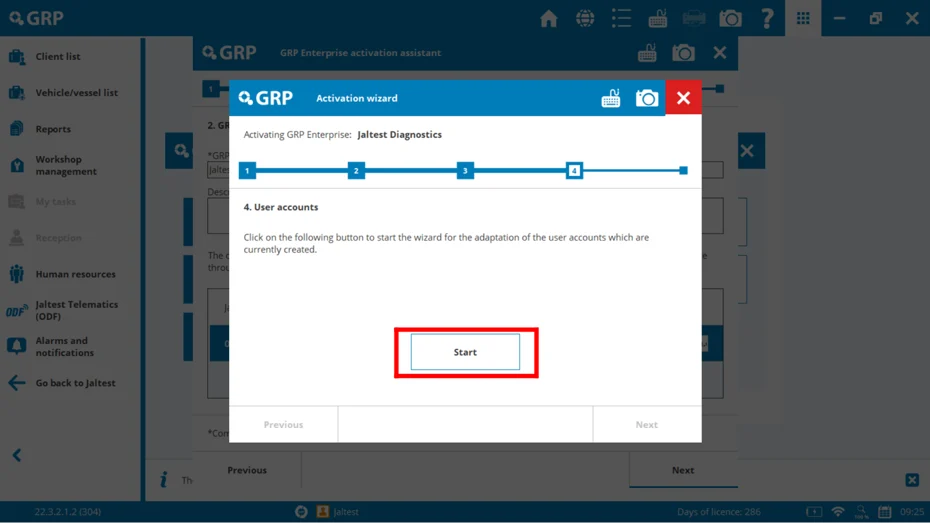
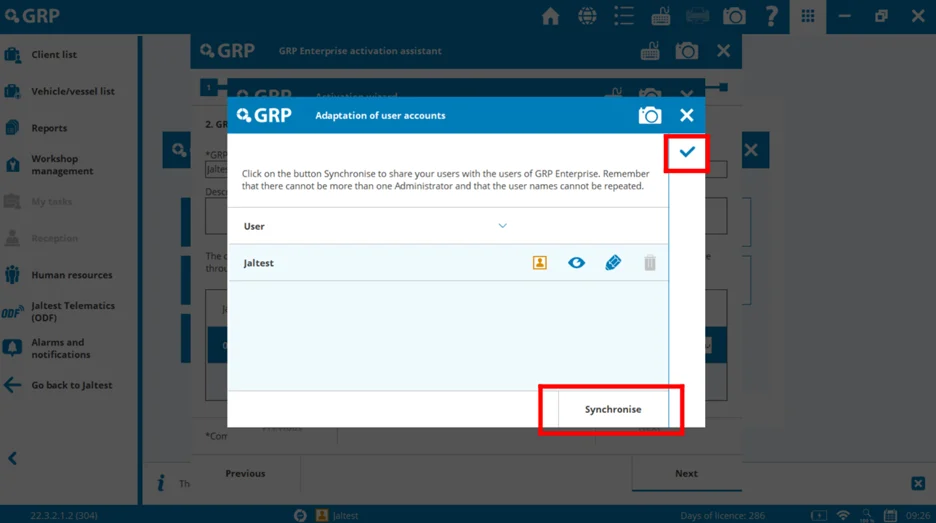
17. Click "Synchronize" then hit the check mark, follow all the instructions provided in the Activation Wizard, and continue with the process.
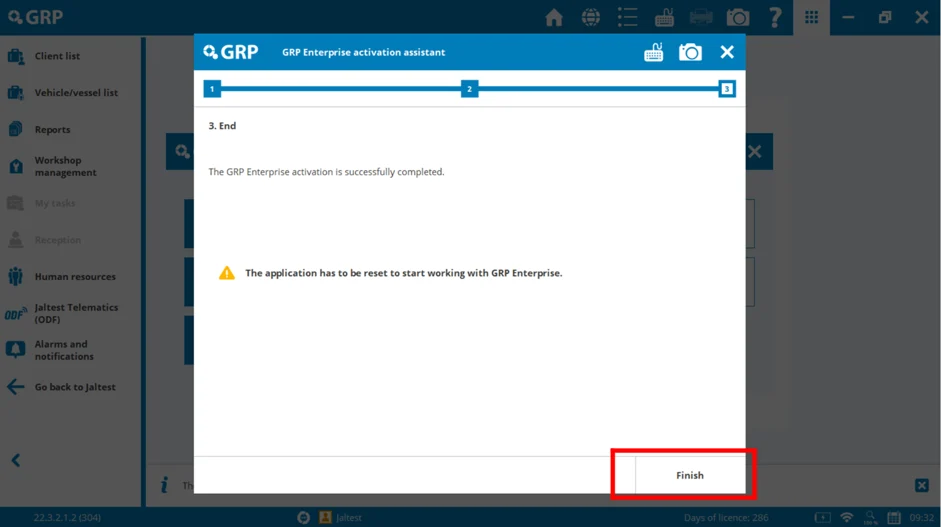
18. Click "Finish" to restart the application and start working with GRP Enterprise.
19. Access your Jaltest GRP Enterprise with your user and password.
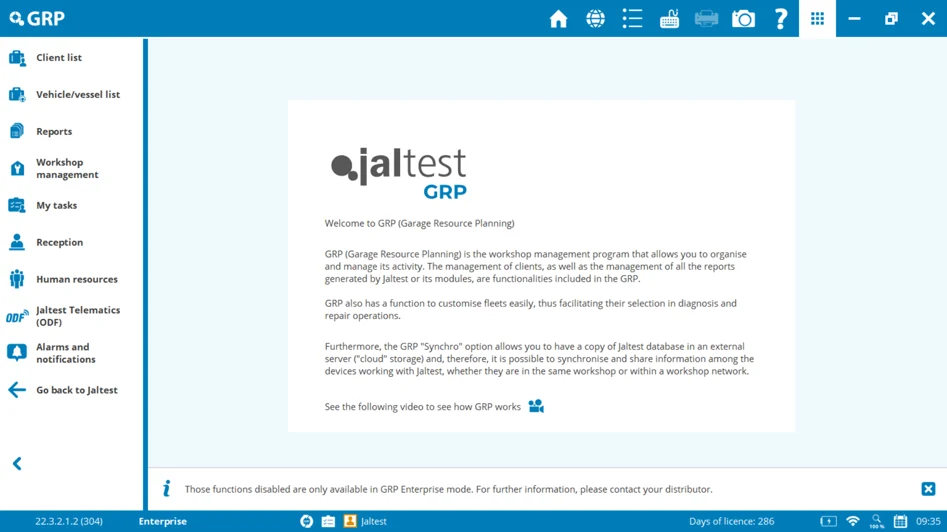
Congratulations! You can start using it!
To learn more about Jaltest GRP, watch the following video:
After you have followed all the steps in this guide, the issue should be fixed and you are ready to continue using Jaltest.
Remember that to access certain technical support functions a Jaltest ATS license is required.

We know that sometimes inconveniences can arise. Therefore, we have created this step-by-step guide to solve error 007 as quickly as possible. You just have to follow the steps mentioned, we have included images to facilitate solving the problem.
If you are receiving this error message in your Jaltest software you need to follow these steps to try to fix it.
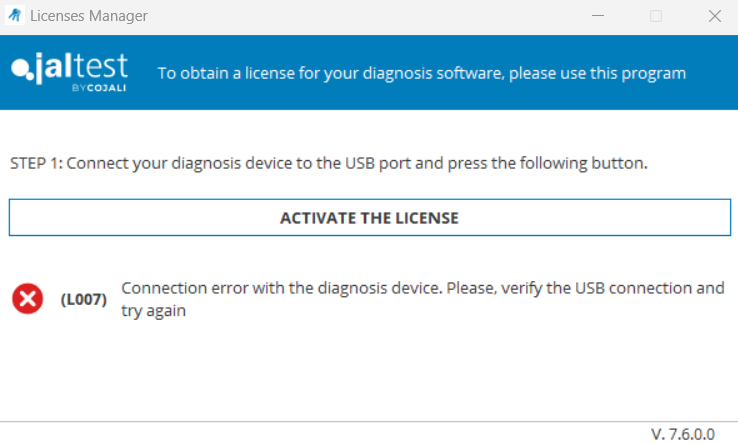
1. Make sure you have the Jaltest link plugged in by USB to the laptop and there are no visible damages in the Jaltest USB port or USB cable and try again.

2. If the problem persists, disconnect Jaltest from the current USB port on the laptop and try a different USB port if possible.
3. If you still have an issue with the Jaltest unit not being recognized try a different USB cable. Any standard printer cable would work.
4. Make sure you have your Windows updates up to date on your laptop. You can access this in the Settings menu, by right-clicking in the Windows icon located at the bottom of the home desktop on your laptop.
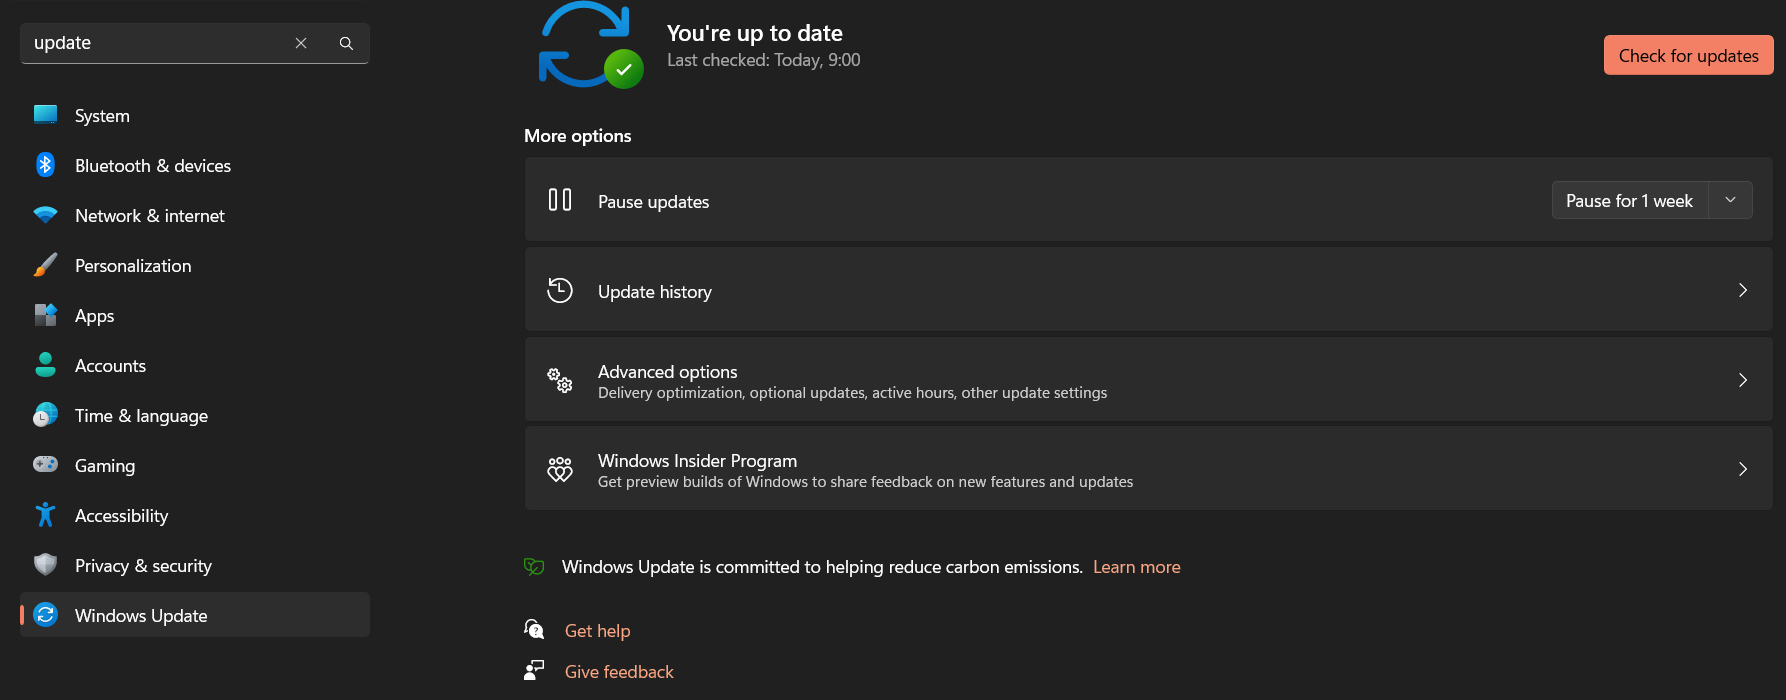
5. Make sure you have all updates available downloaded and installed. The Laptop will show you a notification message requiring you to restart the system to install the updates. Please wait for this notification and reboot the laptop.
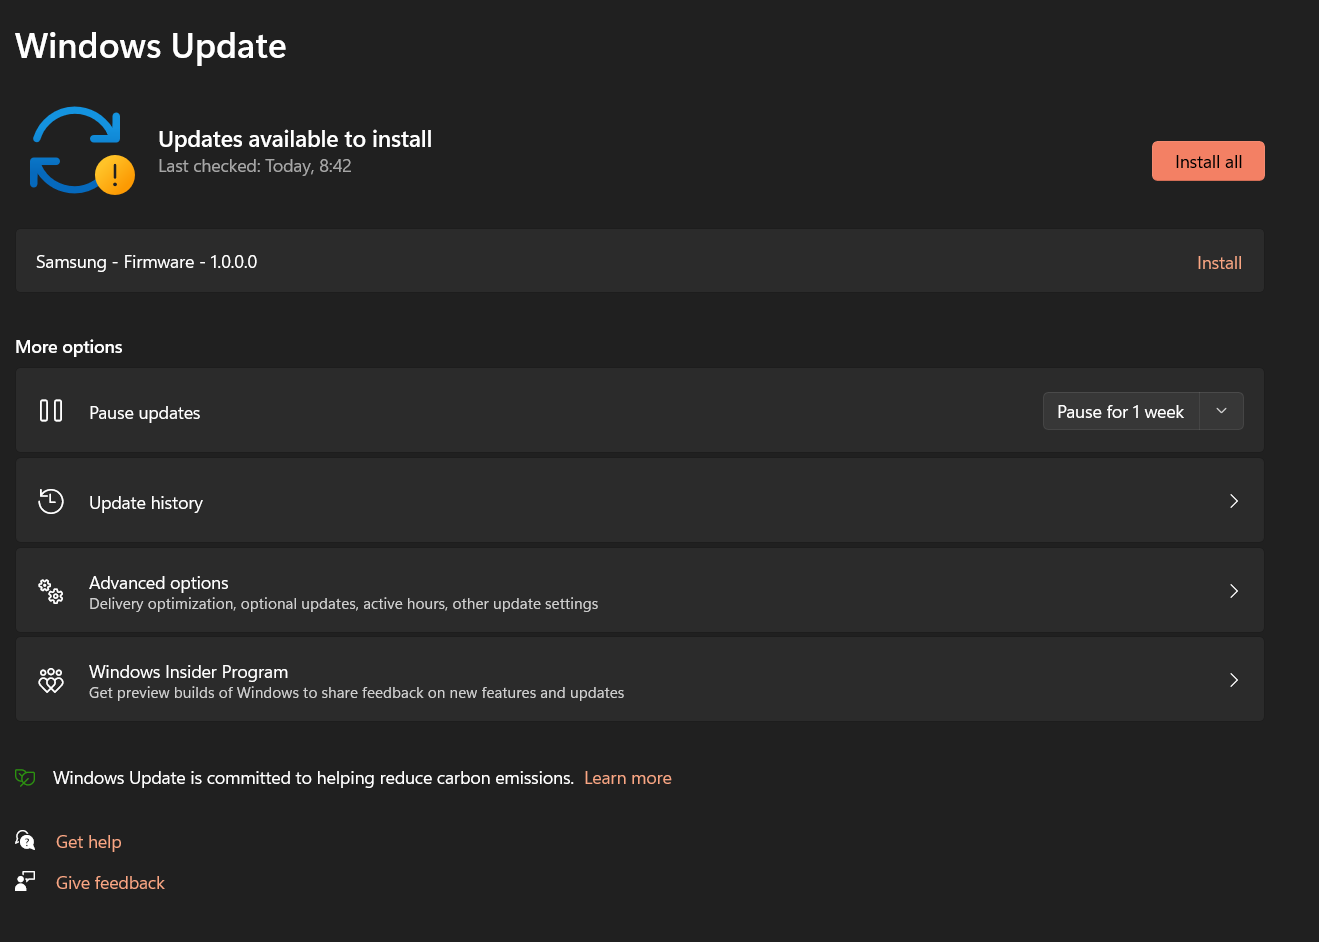
6. Once you have rebooted the laptop, connect your Jaltest link to the USB port on your computer and try again. If you still have issues with the L007 connection error, get in touch with your Jaltest distributor you may need to send the unit in for repair to Cojali USA.
If you are using a V8 or older version of the Jaltest link, you may also inquire about getting a new V9 Jaltest unit with your distributor.
After you have followed all the steps in this guide, the issue should be fixed and you are ready to continue using Jaltest.
Remember that to access certain technical support functions a Jaltest ATS license is required.

We know that sometimes inconveniences can arise. Therefore, we have created this step-by-step guide to install Jaltest as quickly as possible. You just have to follow the steps mentioned, we have included images to facilitate solving the problem.
A. You need to have a connection to the internet and a Jaltest link plugged in by USB to the computer.

B. If you need to check the laptop requirements to install Jaltest software, follow the link below:
Follow these steps:
1. You need to create your Jaltest account on Jaltest.com:
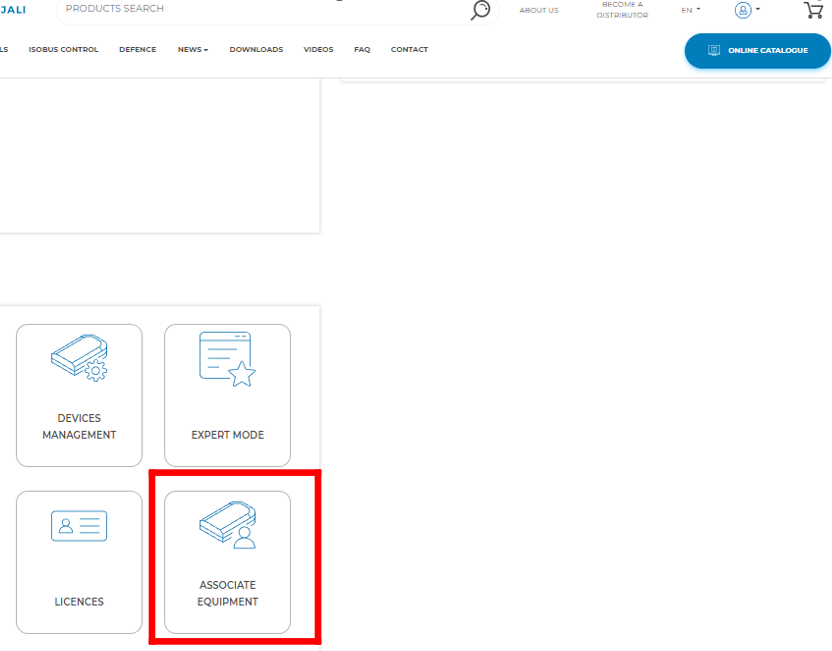
2. Once you have completed this, log in to your Jaltest account.
Go to "Associate Equipment"
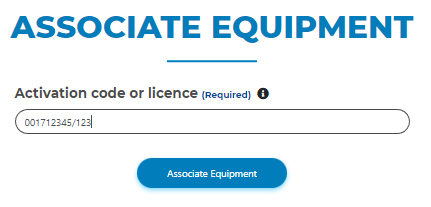
Type in your serial number and activation code from the back of the device and click "Associate Equipment". See the picture below:
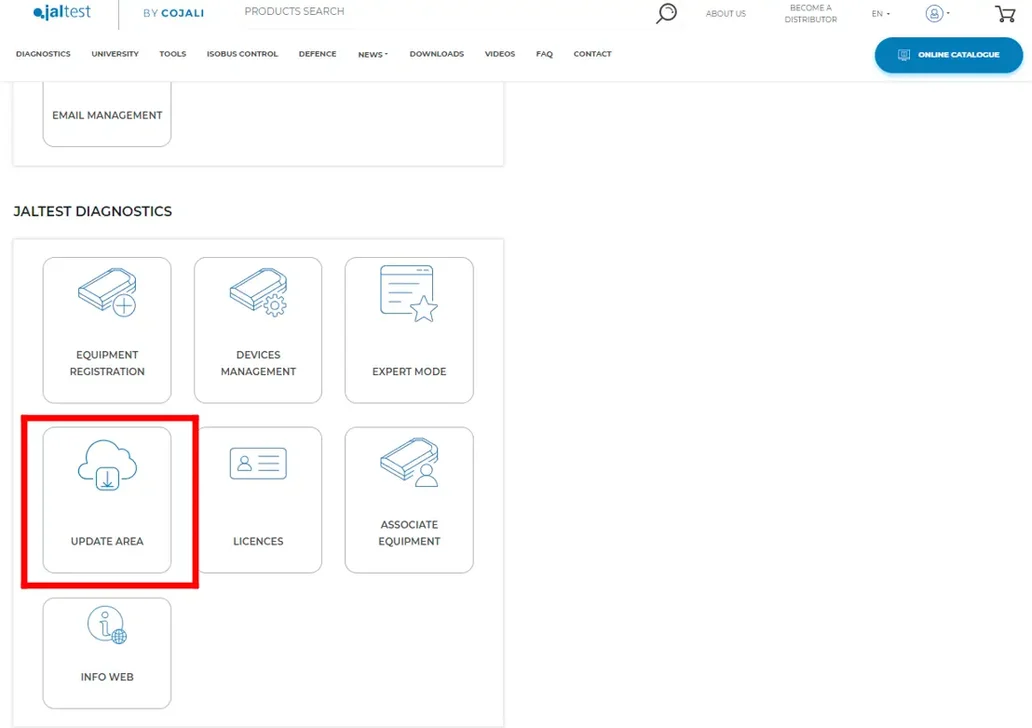
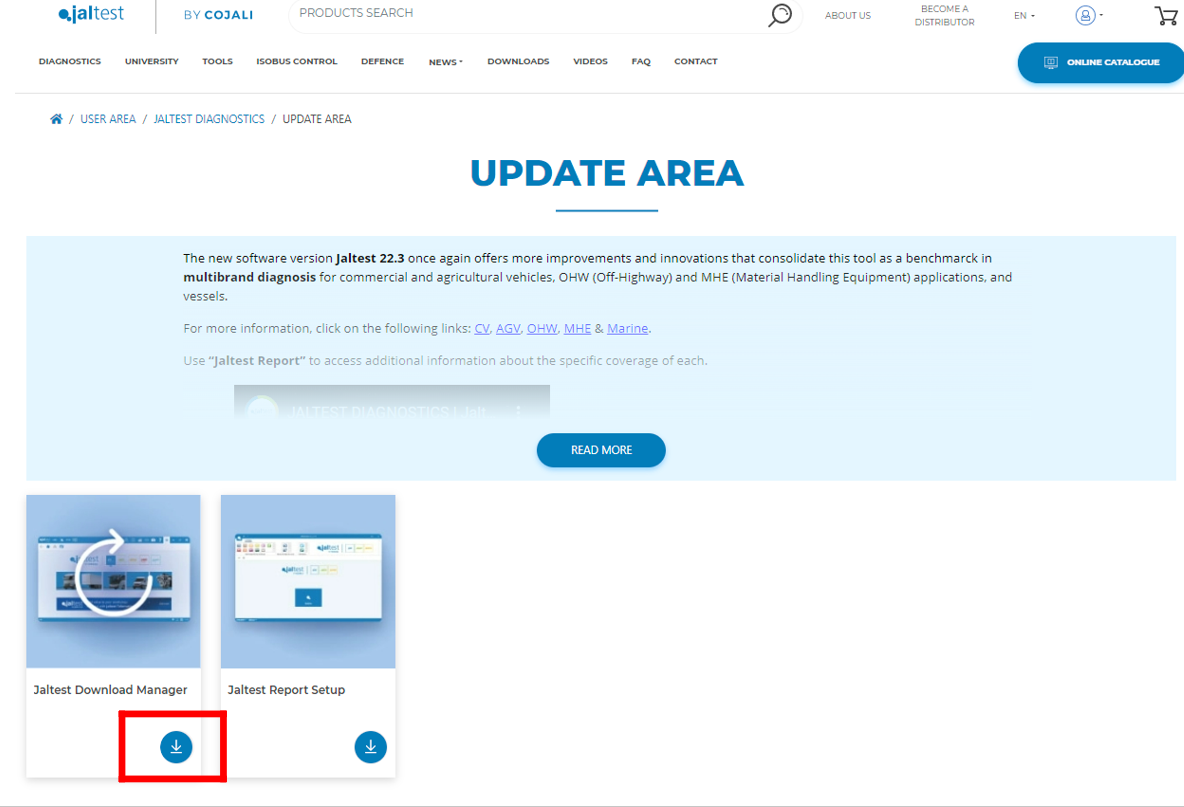
3. Once you have associated your unit to the account, you need to download the software in the "Update Area" by clicking on "Jaltest Download Manager".
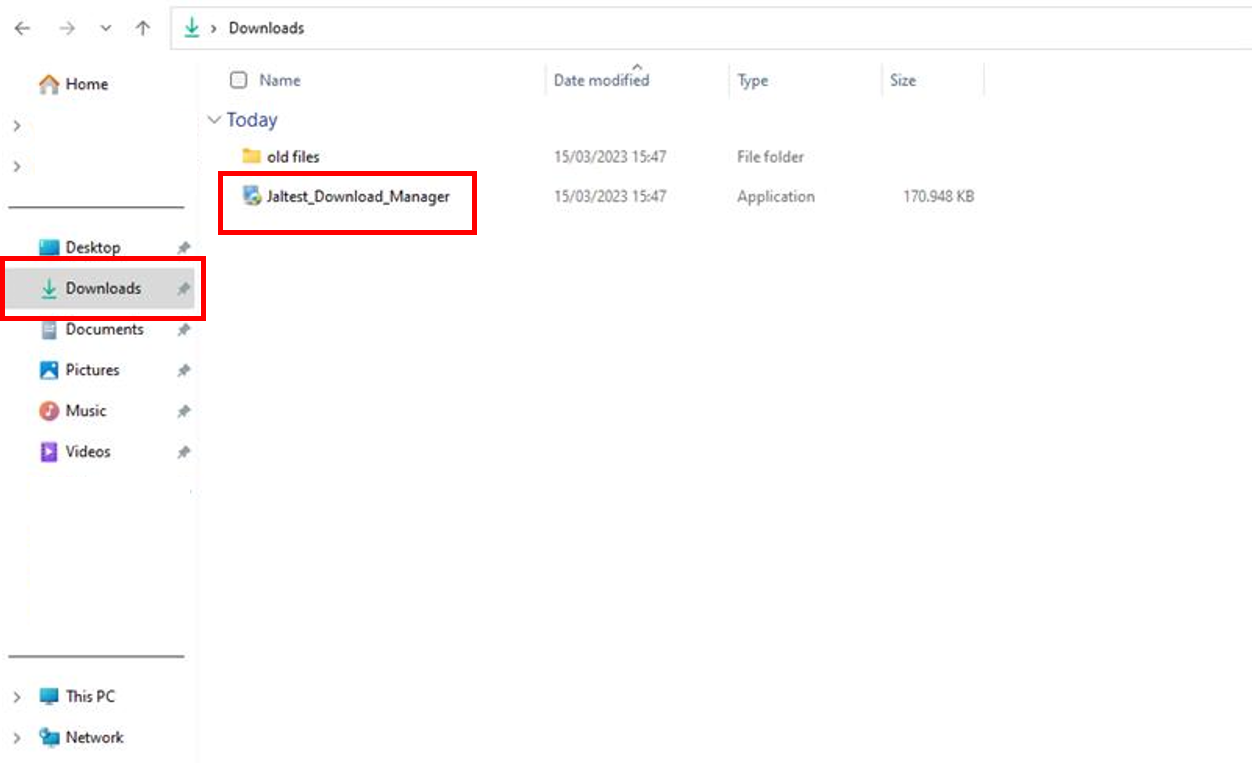
4. Once you get the "Download Manager"
Go to Downloads on your laptop. Right-click on it and select "Run as Administrator" and follow the prompts to start the download.
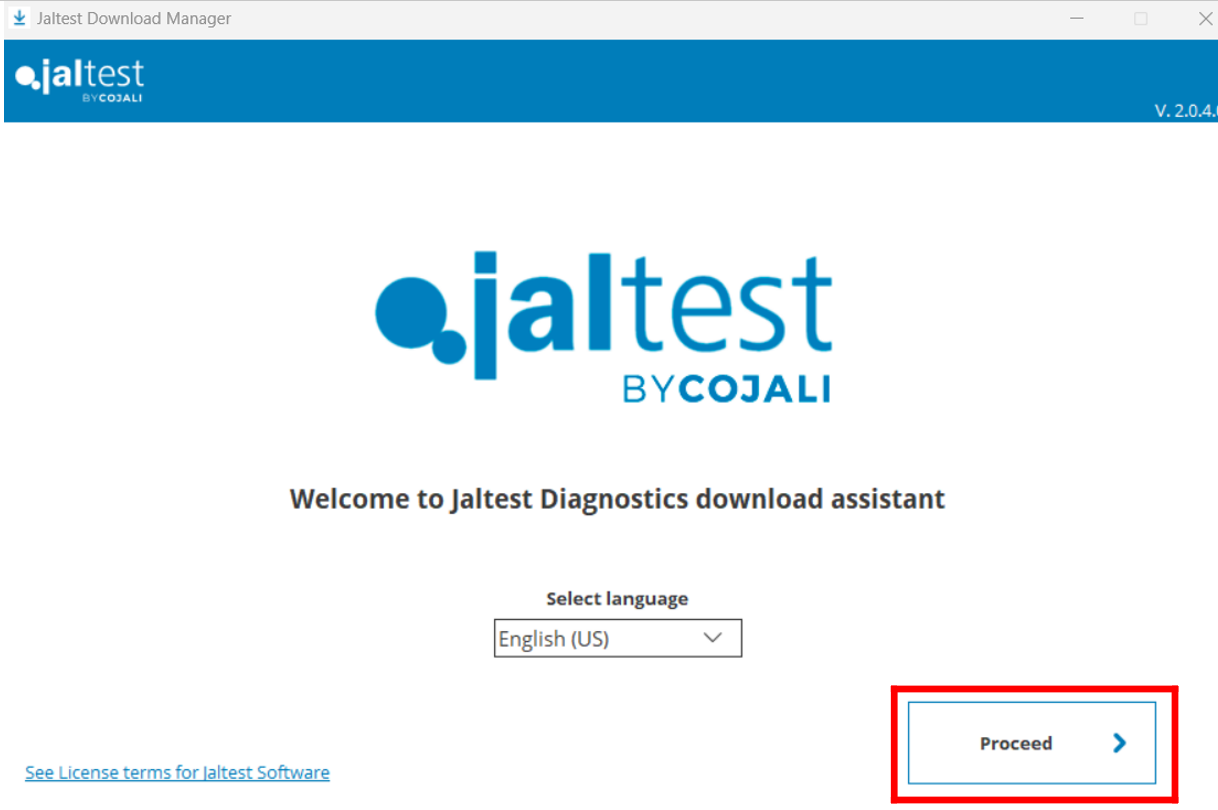
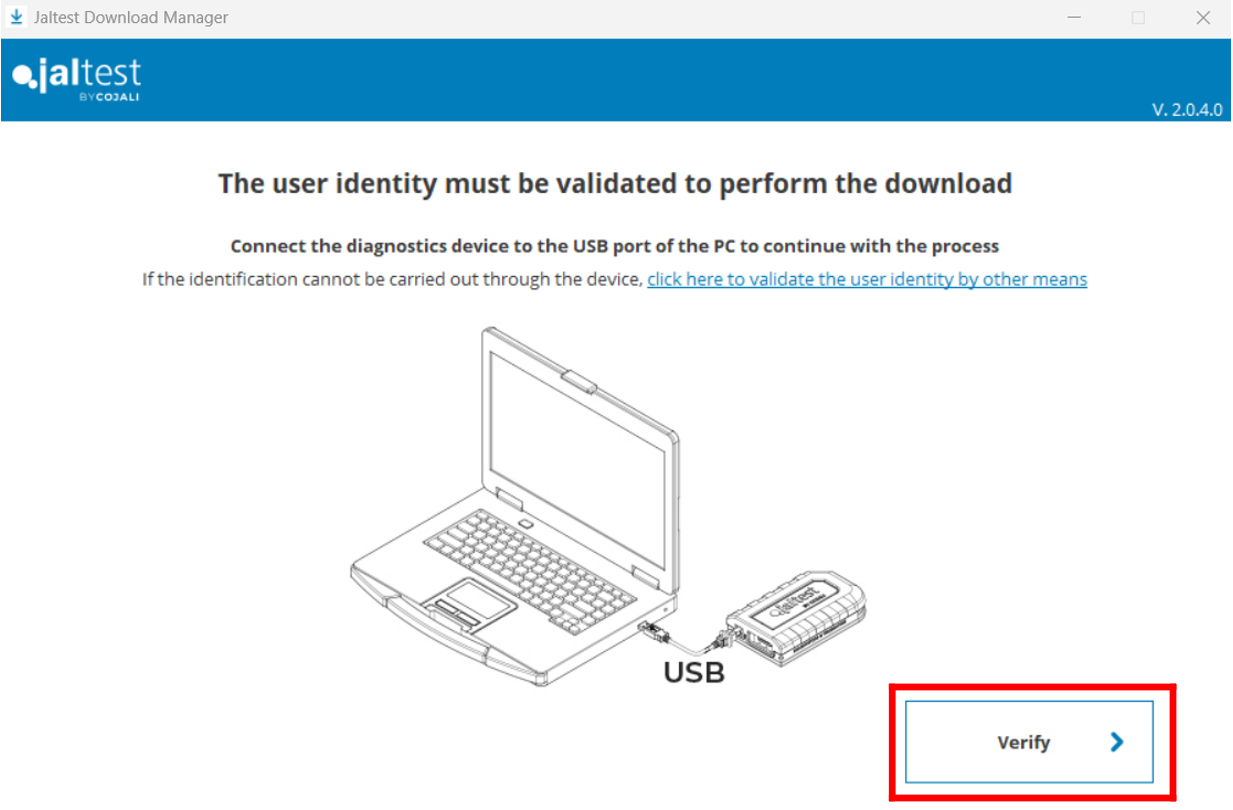
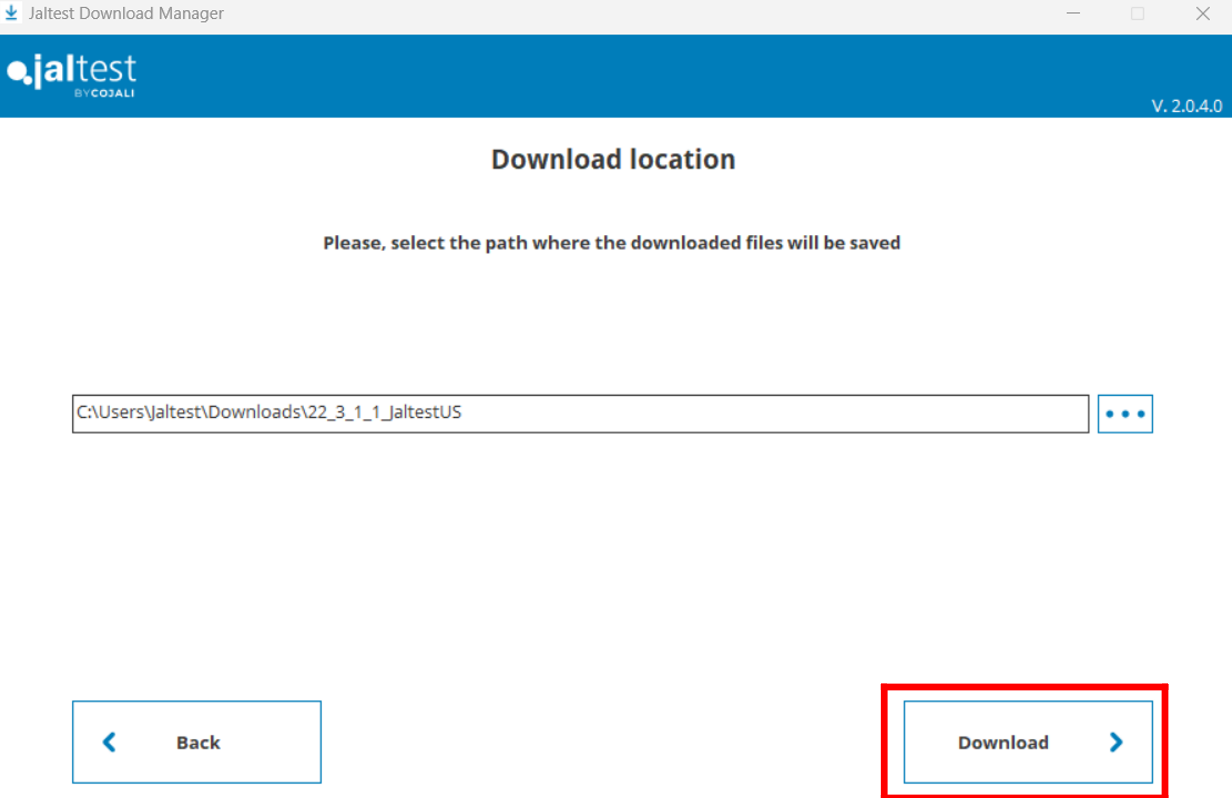
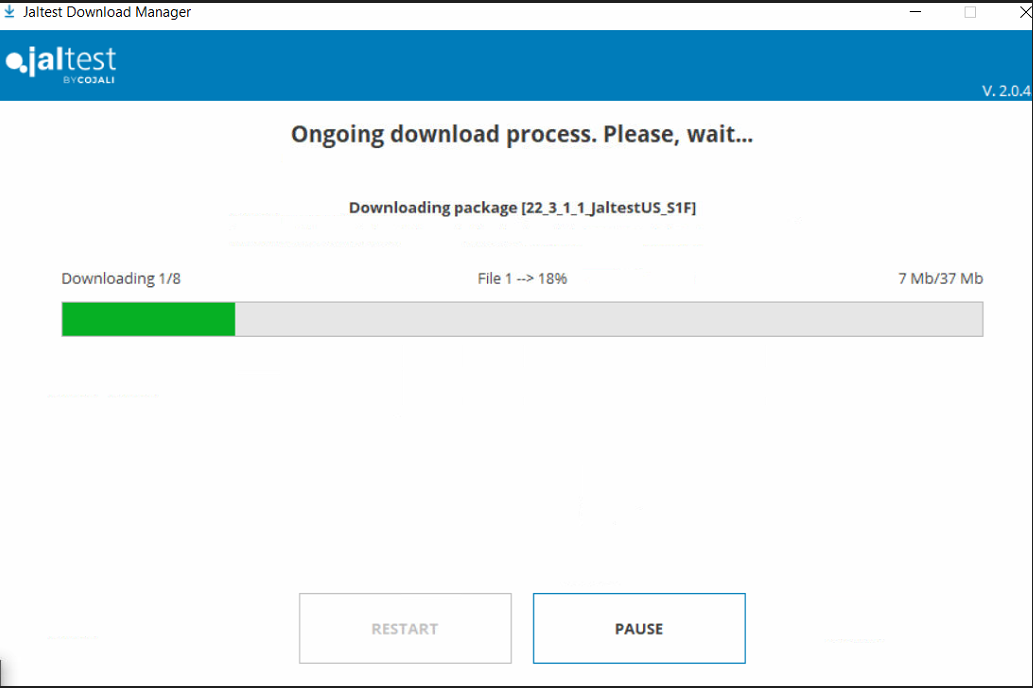
5. Once the software is downloaded, click "Install" to start the installation process
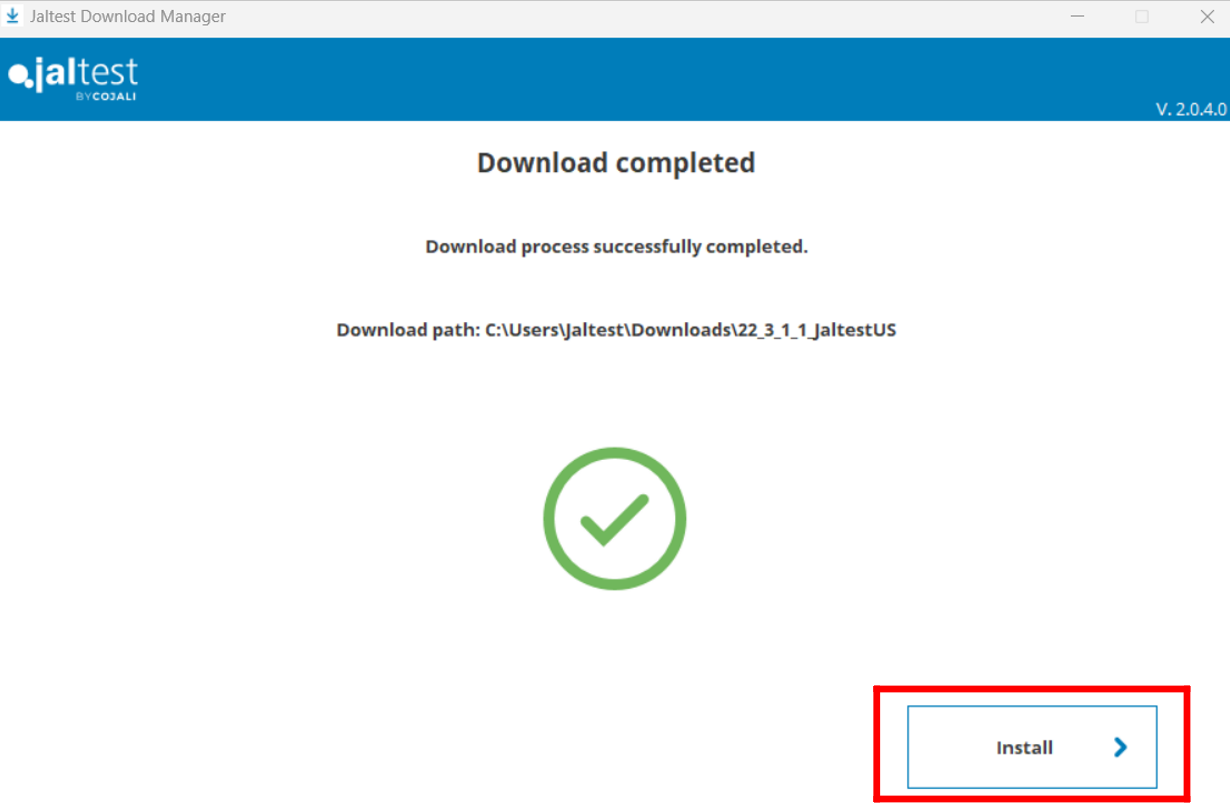
6. Follow the prompts by checking the boxes and clicking next.

7. Click next to all prompts in the installation setup.

8. Select "Complete Installation"

9. Select your country of installation and click "Next" to all prompts to continue.
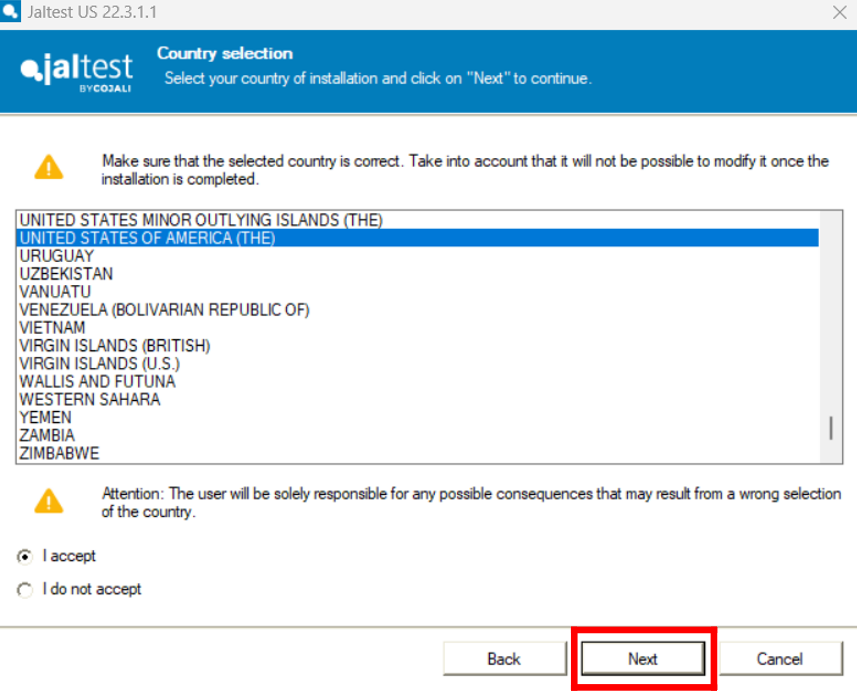
10. Accepts "Terms and conditions" then select " I am already a Jaltest user" and use your login information for Jaltest.com "Client Area"

11. Click "Activate License". Once it activates the license the software configuration will start.


12. Leave the Jaltest link plugged in by USB to the laptop with access to the internet so your unit will be configured properly. Once the configuration has been performed, you can just select "Do not use wizard"

13. Check the box and hit "Finish" and you have installed the software.

14. You are all set and can start using the device! however, before using it, make sure you set up your Expert Mode as well so you can do Regens, Parameter changes, Calibrations, and more!
Use this article for help to set up "Expert Mode"
HOW DO I GENERATE EXPERT MODE?
After you have followed all the steps in this guide, you should be ready to start using Jaltest.
Remember that to access certain technical support functions a Jaltest ATS license is required.

We know that sometimes inconveniences can arise. Therefore, we have created this step-by-step guide to solve error 007 as quickly as possible. You just have to follow the steps mentioned, we have included images to facilitate solving the problem.
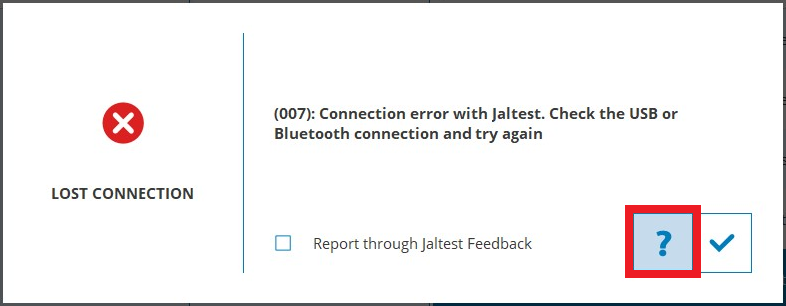
Please, check the additional information provided by clicking on the question mark icon on the error message as shown in the picture.
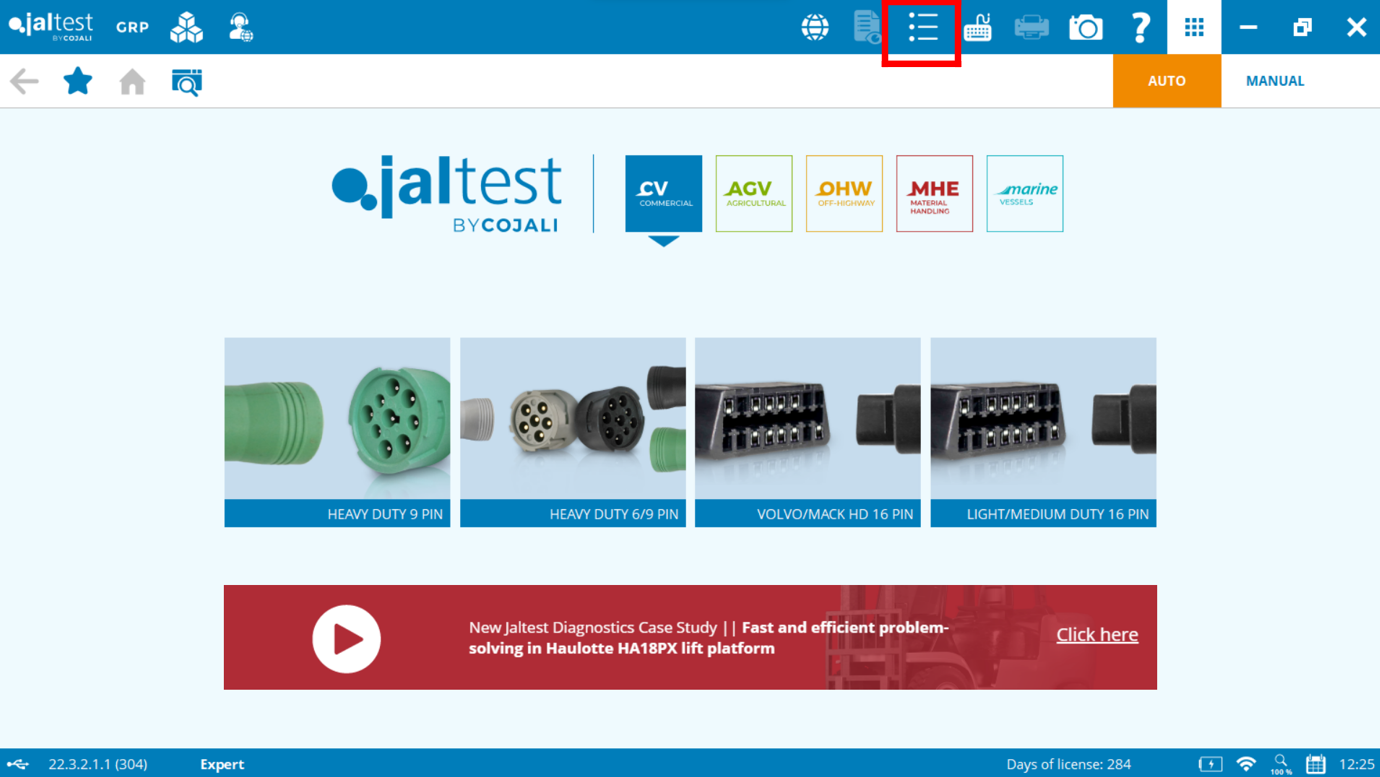
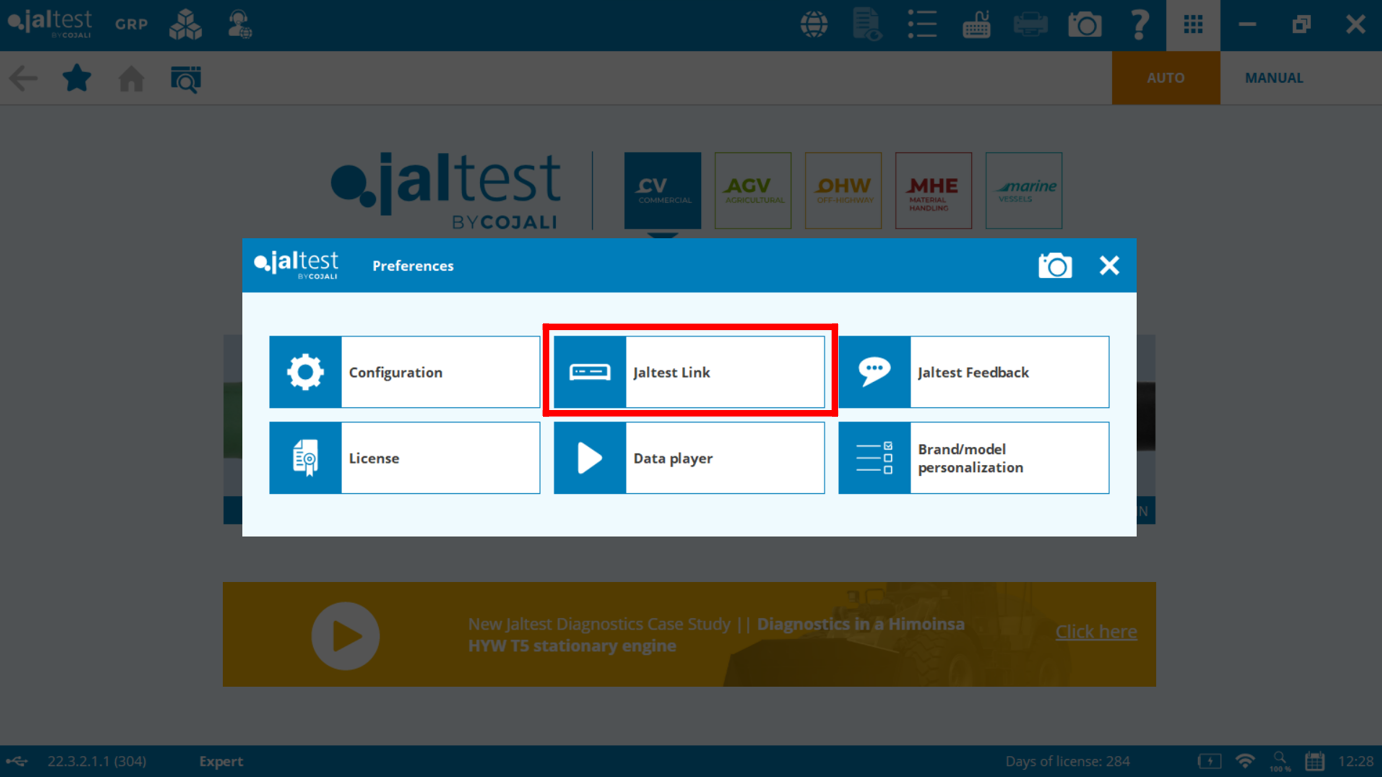
Note: Check the USB or Bluetooth connection with the PC, as well as the communication channel selected in Jaltest. This configuration is available in the “Jaltest Link” option of the main configuration menu (See pictures below). If the problem continues, restart the computer and try again.
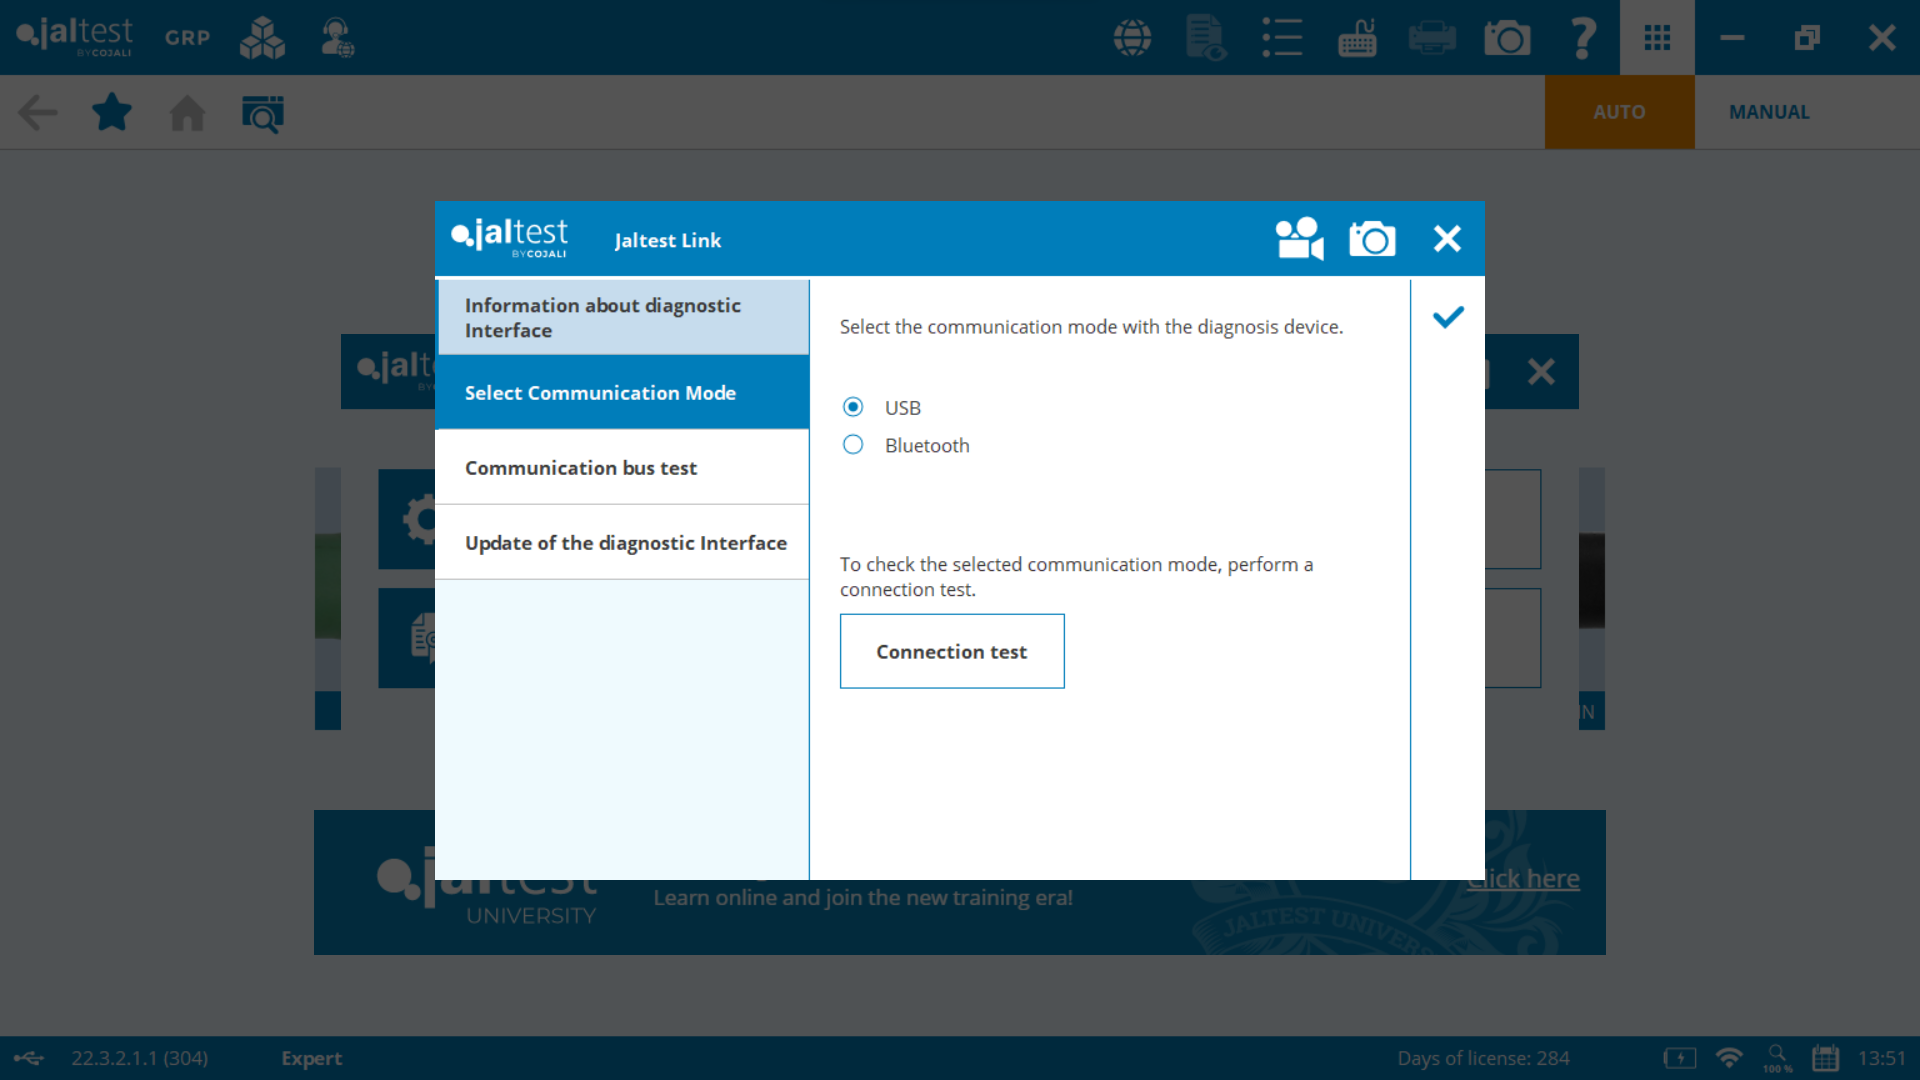
If the problem persists, contact customer support at (305) 960-7651 or email us at customersupport@jaltest.com.
After you have followed all the steps in this guide, the issue should be fixed and you are ready to continue using Jaltest.
Remember that to access certain technical support functions a Jaltest ATS license is required.

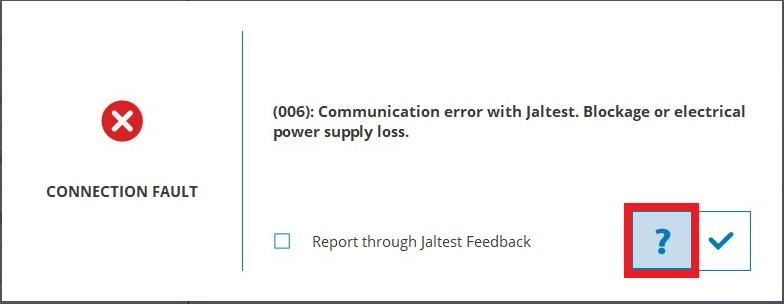
Please, check the additional information provided by clicking on the question mark icon on the error message as shown in the picture.
If the problem persists, contact customer support at (305) 960-7651 or email us at customersupport@jaltest.com.

First of all, contact your local Jaltest Distributor to try to solve the problem.
If the Distributor cannot solve the problem, they should contact Jaltest Customer Support, who will remote into the PC and assist with any software issue that may arise. This support is focused on the product and not on the technical details of the repair process.
In order to provide remote access to customer support you need to follow these steps:
1. Access the "Help Menu".
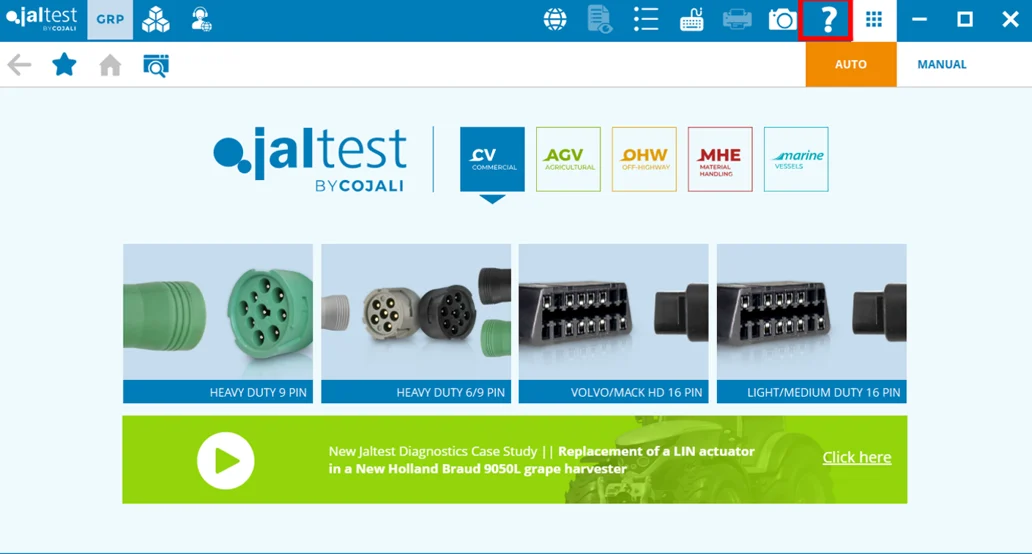
2. Click on "Remote Assistance"
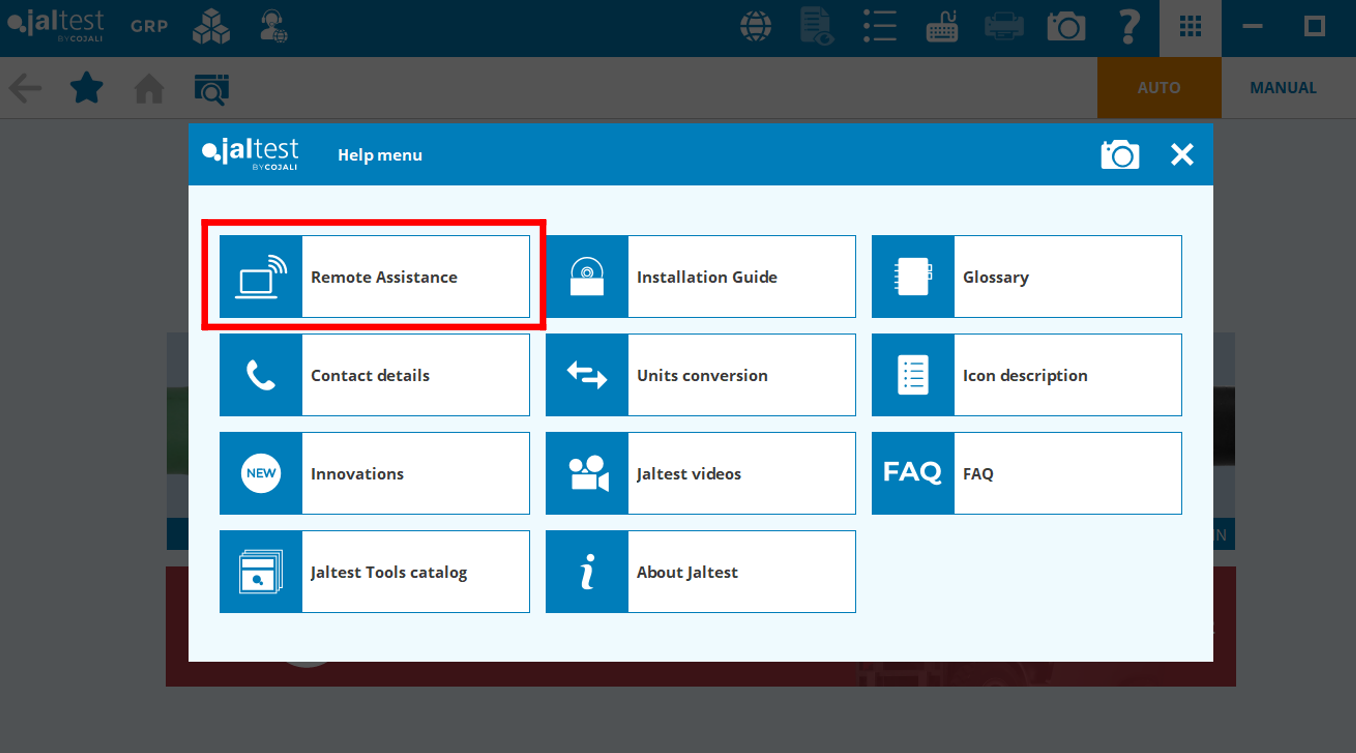
3. Accept the Terms and conditions.
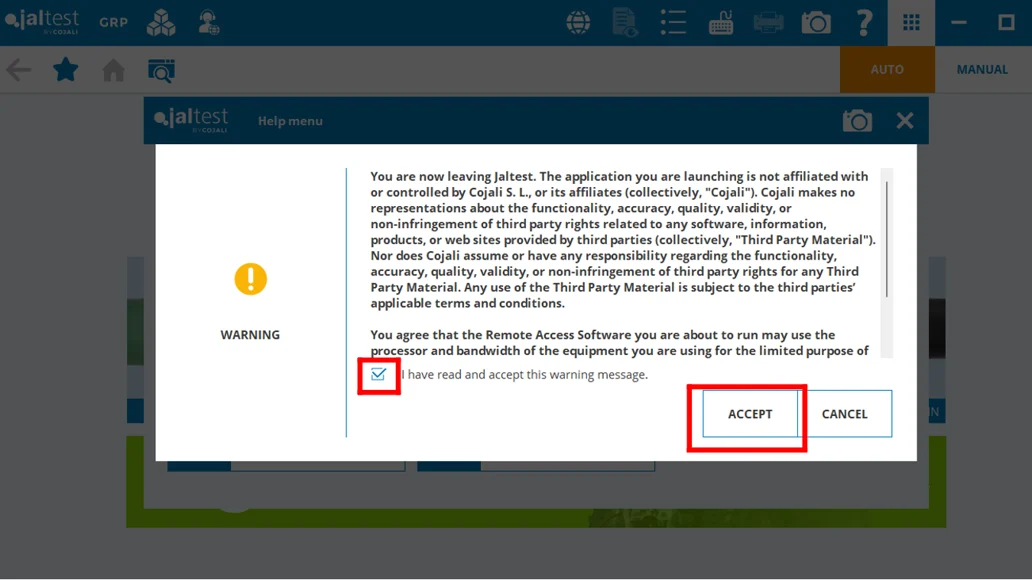
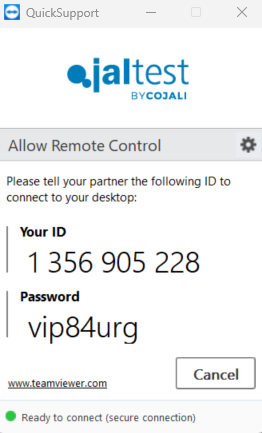
4. Call us at (305) 960-7651 or email us at: customersupport@jaltest.com and provide our team with the Quicksupport ID and Password.

We know that sometimes inconveniences can arise. Therefore, we have created this step-by-step guide so you can connect to a Trailer ABS system as quickly as possible. You just have to follow the steps mentioned, we have included a video to facilitate solving the problem.
You will need the PLC Adapter cable (Part Number: JDC 112A) if you wish to perform diagnostics on a standalone trailer without needing to connect it to the tractor to provide a power supply.
You also may need the PLC Power Supply Adapter Cable (Part Number: JDC 40AM2, recommended).
Jaltest Software will perform an automatic scan of the ABS system of your trailer and provide the necessary information, depending on the ABS system.
To learn more about this watch this video:
After you have followed all the steps in this guide, the issue should be fixed and you are ready to continue using Jaltest.
Remember that to access certain technical support functions a Jaltest ATS license is required.

We know that sometimes inconveniences can arise. Therefore, we have created this step-by-step guide to re-activate your license as quickly as possible. You just have to follow the steps mentioned, we have included images to facilitate solving the problem.
1. You need to have your Jaltest unit plugged in by USB to the laptop.
2. Click on "Days of license" located at the bottom right corner of your Jaltest software.
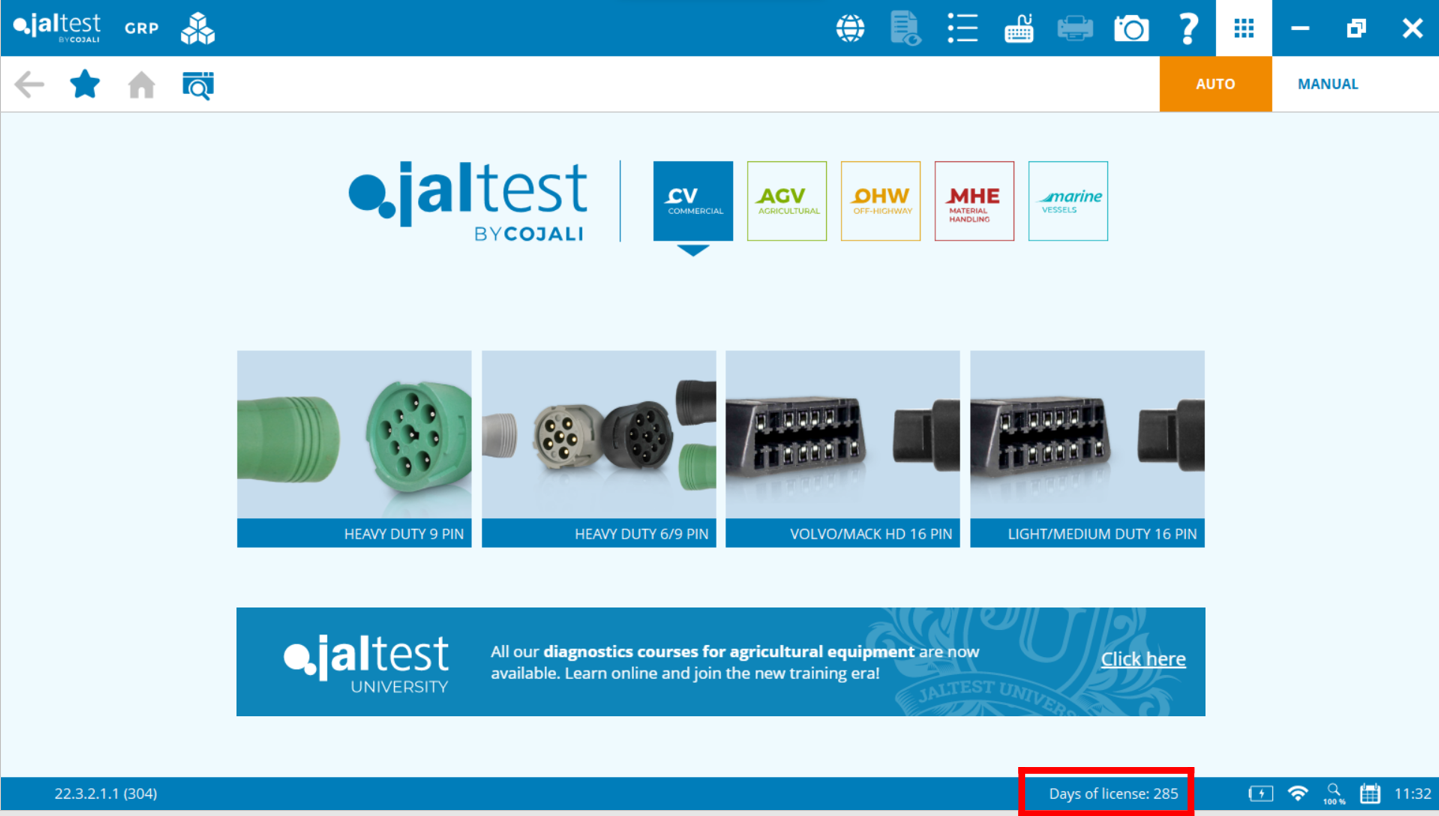
3. Click on “License process renewal" and “License Management” (this option will prompt you to close your software).
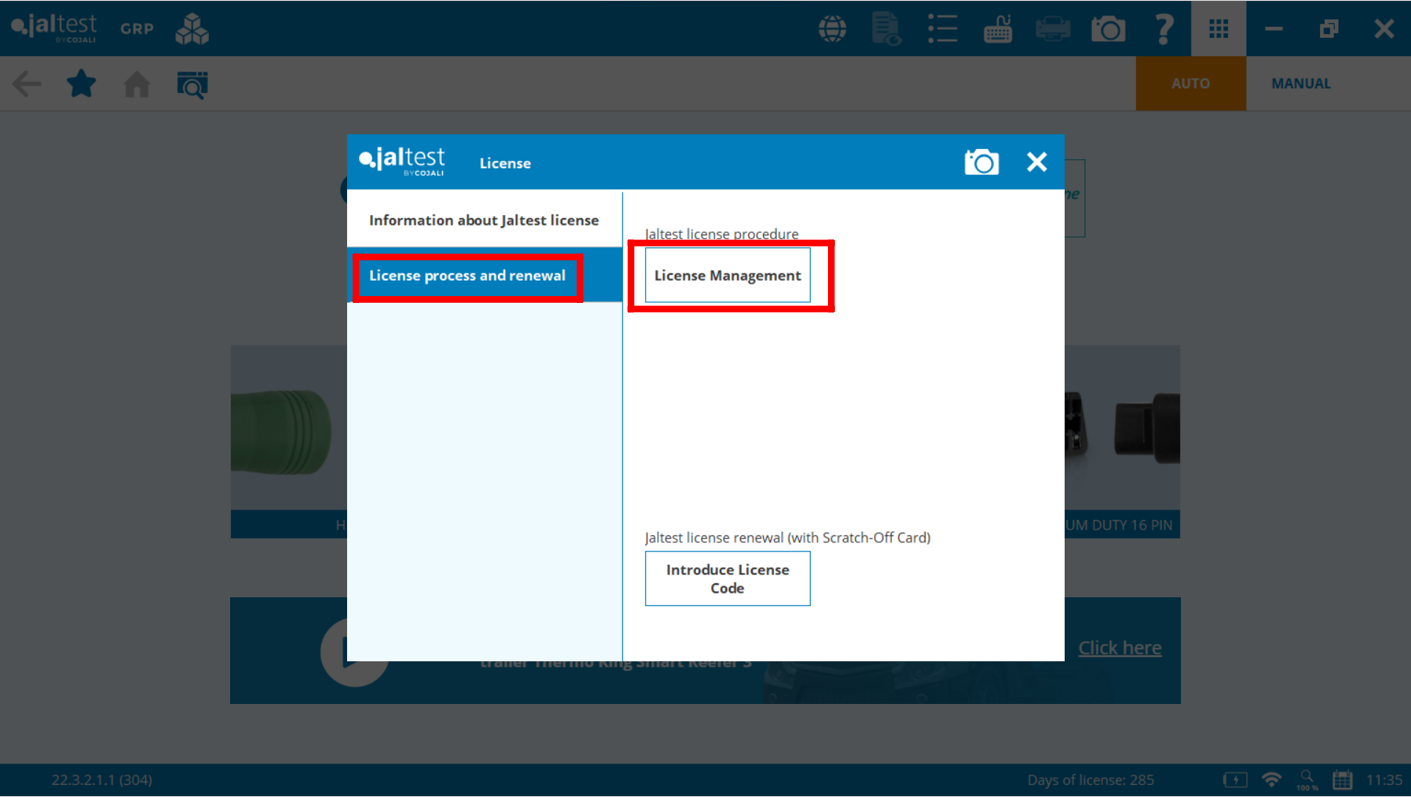
4. Click on "RENEW THE LICENSE"
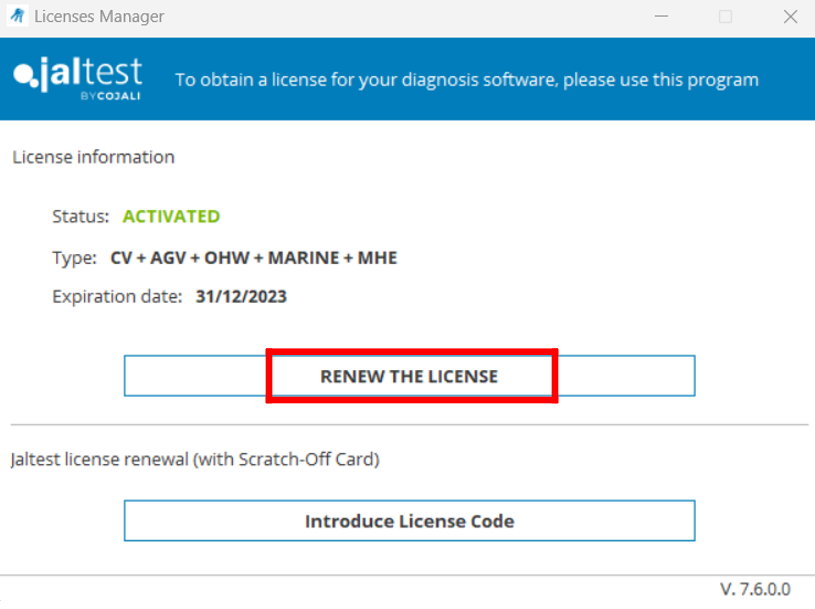
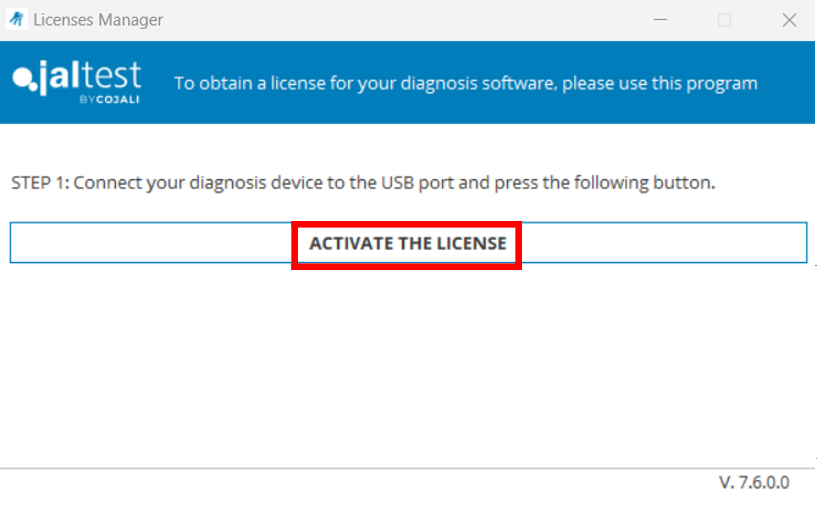
5. Click "Activate the license" and your license renewal will be applied.
After you have followed all the steps in this guide, the issue should be fixed and you are ready to continue using Jaltest.
Remember that to access certain technical support functions a Jaltest ATS license is required.

We know that sometimes inconveniences can arise. Therefore, we have created this step-by-step guide so you can obtain your expert mode as quickly as possible. You just have to follow the steps mentioned, we have included images to facilitate solving the problem.
1. Login to your “Client Access”: JALTEST LOGIN
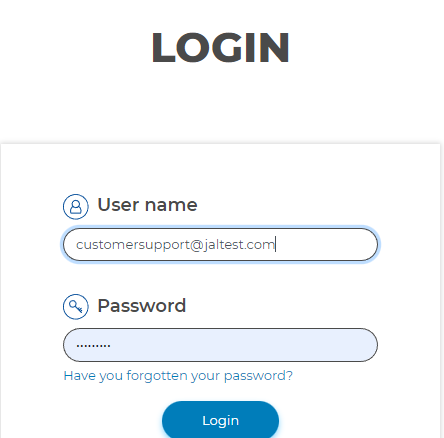
2. If you don't know your password, use the option "Have you forgotten your password" available on the website to reset it.
Need to change the email or create a new Jaltest account? Check this article for help:
CHANGE EMAIL ASSOCIATED TO MY JALTEST ACCOUNT
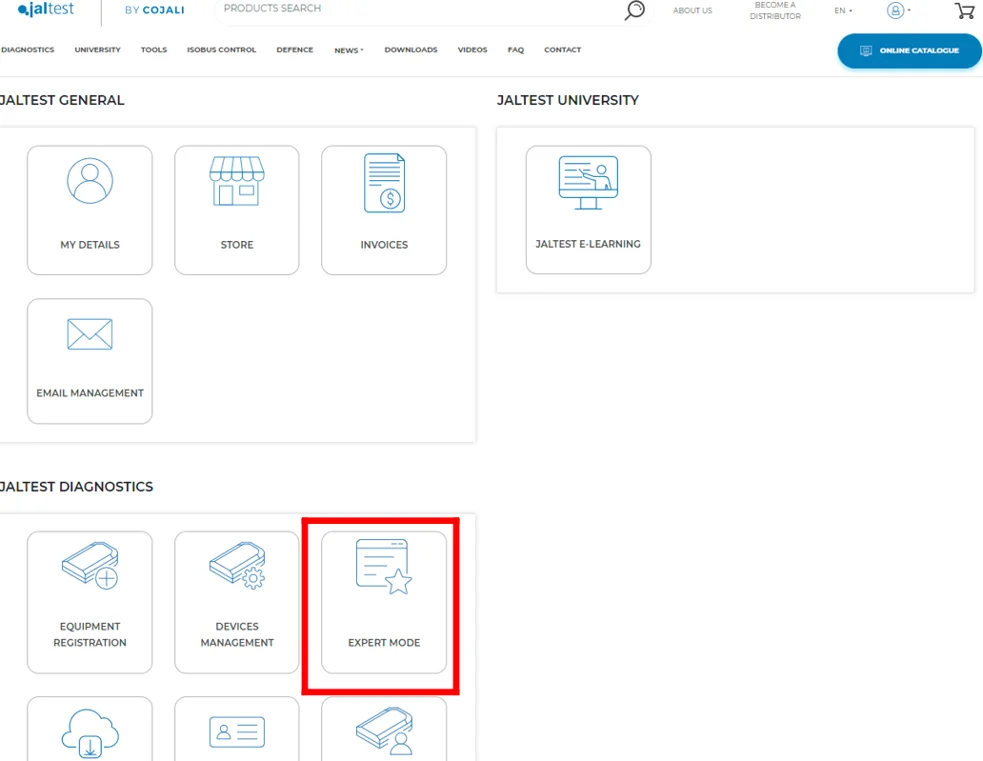
3. Once you log in, head over to the “Expert Mode” tab.
4. Fill in the contact information.
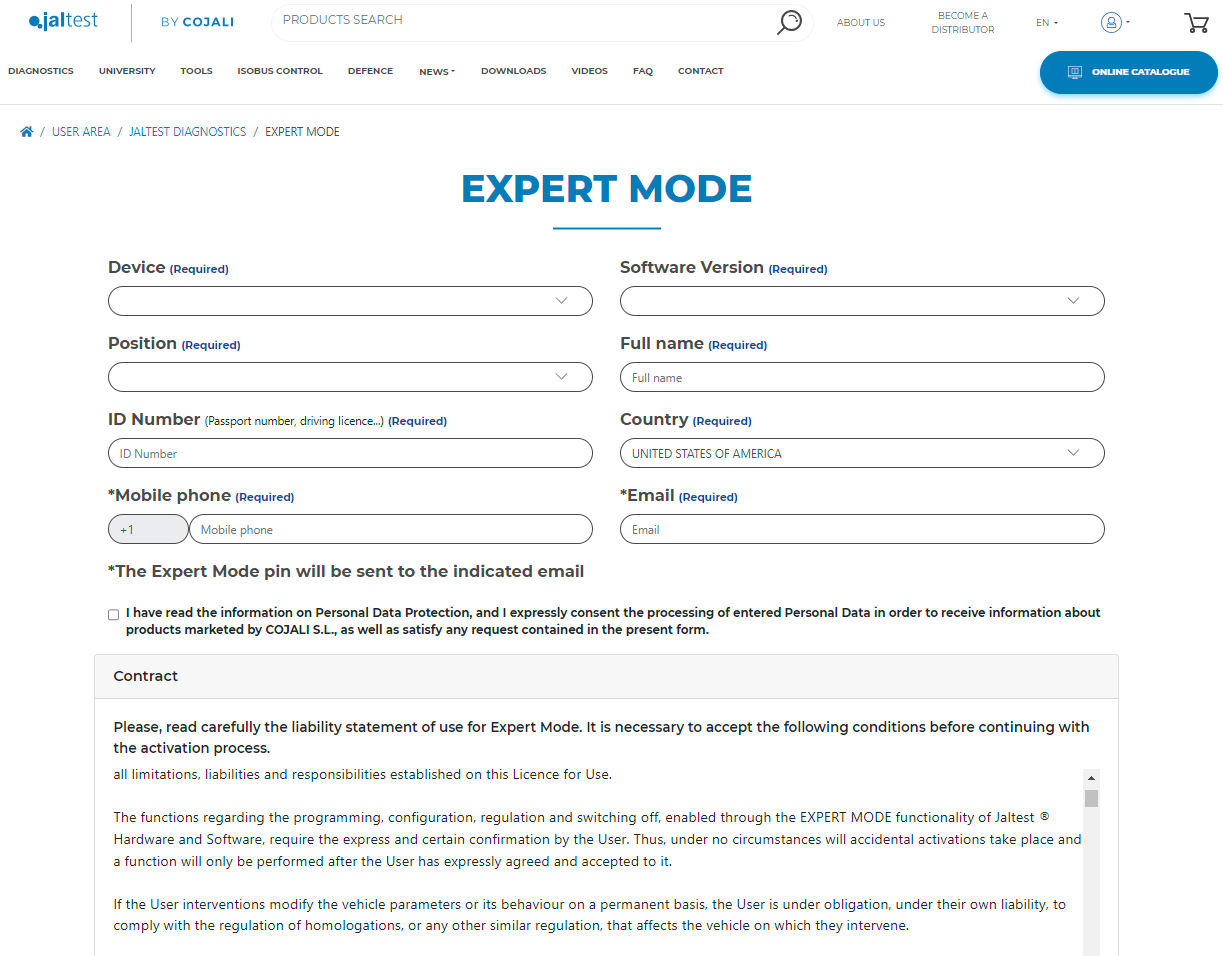
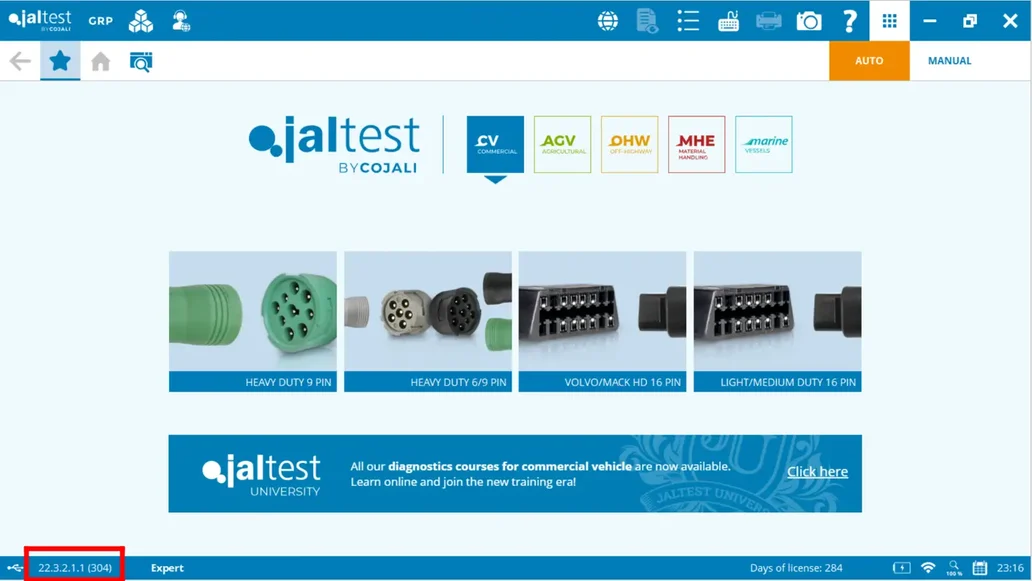
5. Select the device serial number you will generate expert mode for and the software version you have in the software.
If you need to check what software version you have in the software, you can open the software and have a look at the bottom left corner to know the version:
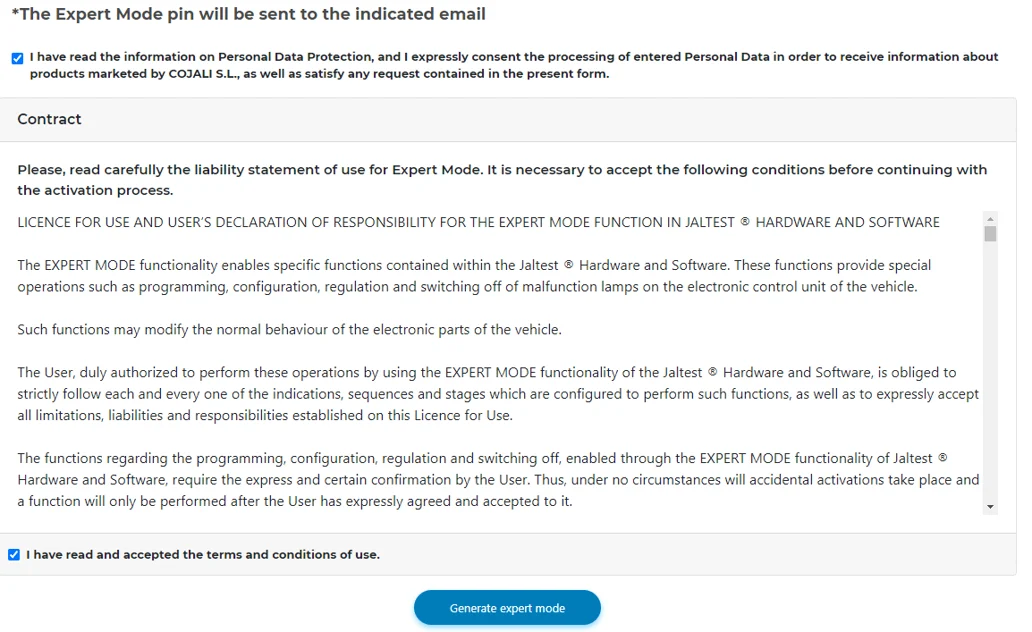
6. Read and accept the terms and conditions of use of the Expert Mode and click "Generate expert mode"
7. Check your mobile phone and/or e-mail address and make sure you have received your Expert Mode code.
Maybe easier if you visualize the process? Watch the video!
After you have followed all the steps in this guide, the issue should be fixed and you are ready to continue using Jaltest.
Remember that to access certain technical support functions a Jaltest ATS license is required.

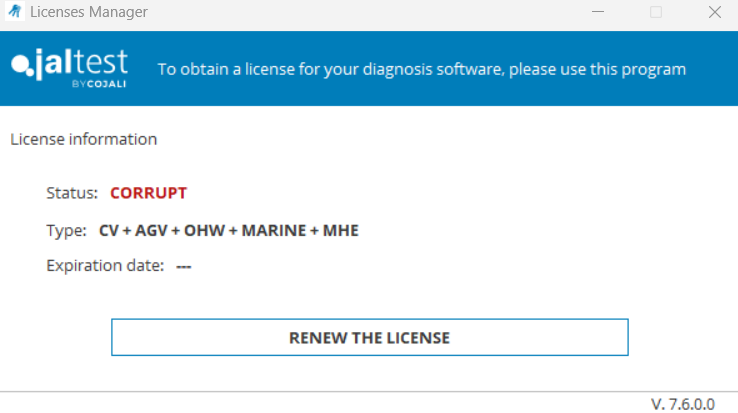
1. Check that the time and date on your computer are correct. If you have Jaltest software installed on more than one computer, ensure that the software versions on the other computers match, as well the date and time.
2. Re-activate your license. Click "RENEW THE LICENSE".
3. If the problem persists, contact Customer Support: Phone: 305.960.7651 – Email: customersupport@jaltest.com

We know that sometimes inconveniences can arise. Therefore, we have created this step-by-step guide so Customer Support can remotely connect to your software. You just have to follow the steps mentioned, we have included images to facilitate solving the problem.
In Jaltest Software, there is an automatic installation of TeamViewer/Quicksupport.
This can be launched from a desktop icon or from the question mark on the top right side of the software.
1. Click on the question mark.

2. Select the “Remote Assistance” option.
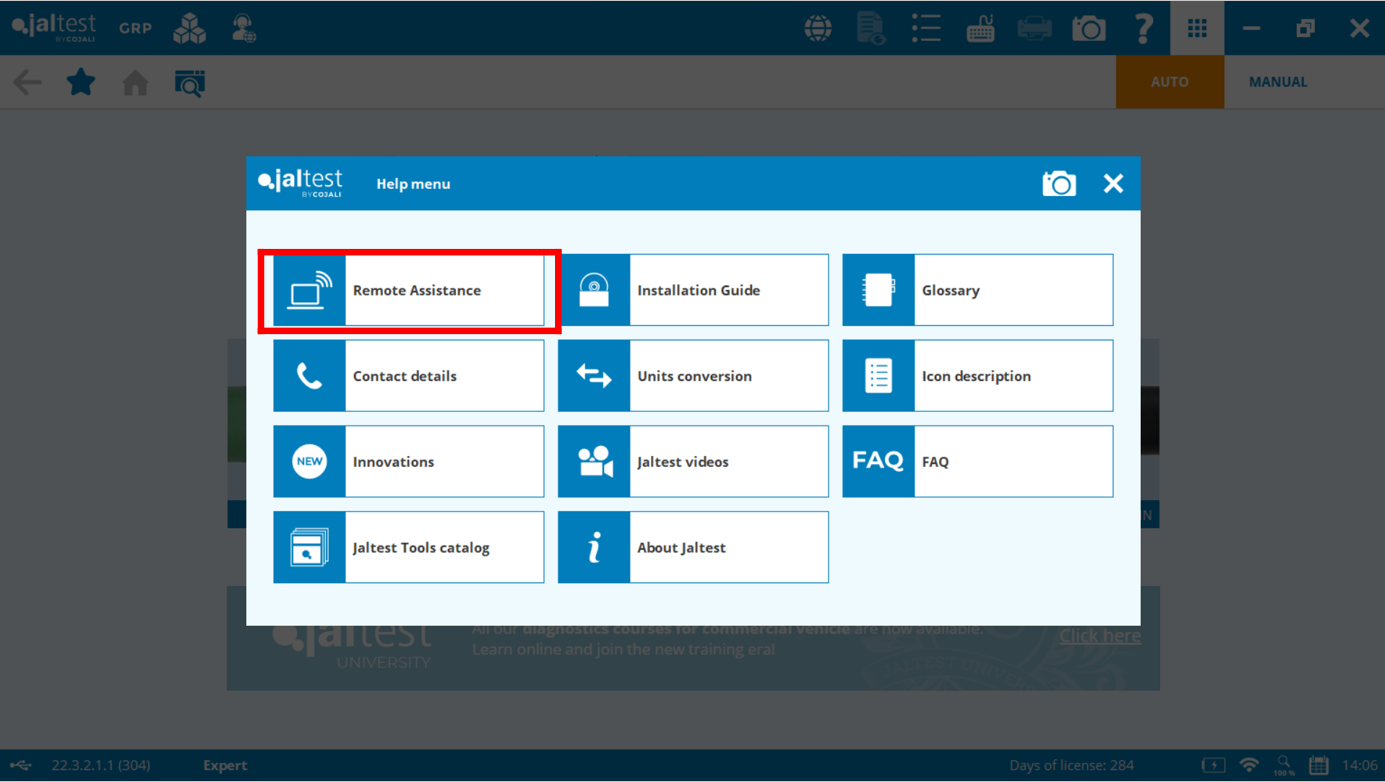
3. Accept the term and conditions.
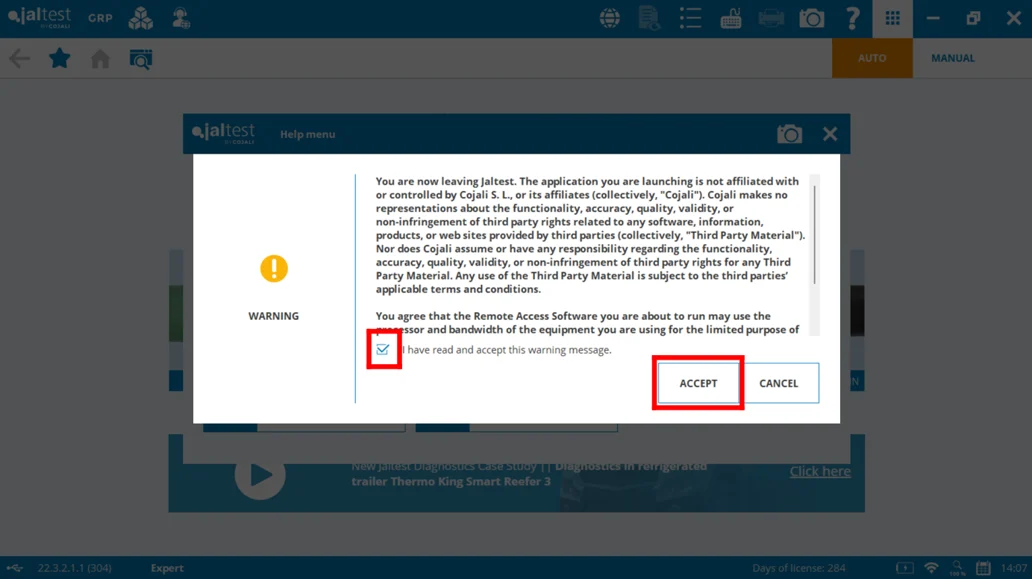
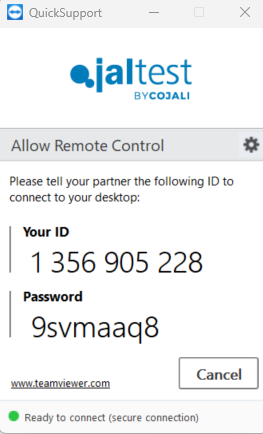
4. Provide our Customer Support team with your ID and password. Our phone number is (305) 960-7651 or email us at customersupport@jaltest.com.
After you have followed all the steps in this guide, the issue should be fixed and you are ready to continue using Jaltest.
Remember that to access certain technical support functions a Jaltest ATS license is required.

Installing the latest Jaltest Software version will usually fix this problem.
If the problem persists, contact Customer Support: Phone: (305) 960-7651 or Email: customersupport@jaltest.com.
In order to better address any issues you may have with your Jaltest Equipment our team would need to have remote access to the computer containing your Jaltest software.
Please follow these steps:
1. Download and run this file. Internet access is necessary.
2. Provide our Customer Support team with the ID and PASSWORD displayed.
3. Connect the Jaltest Link to the computer by USB cable.

AUTO CONNECTION
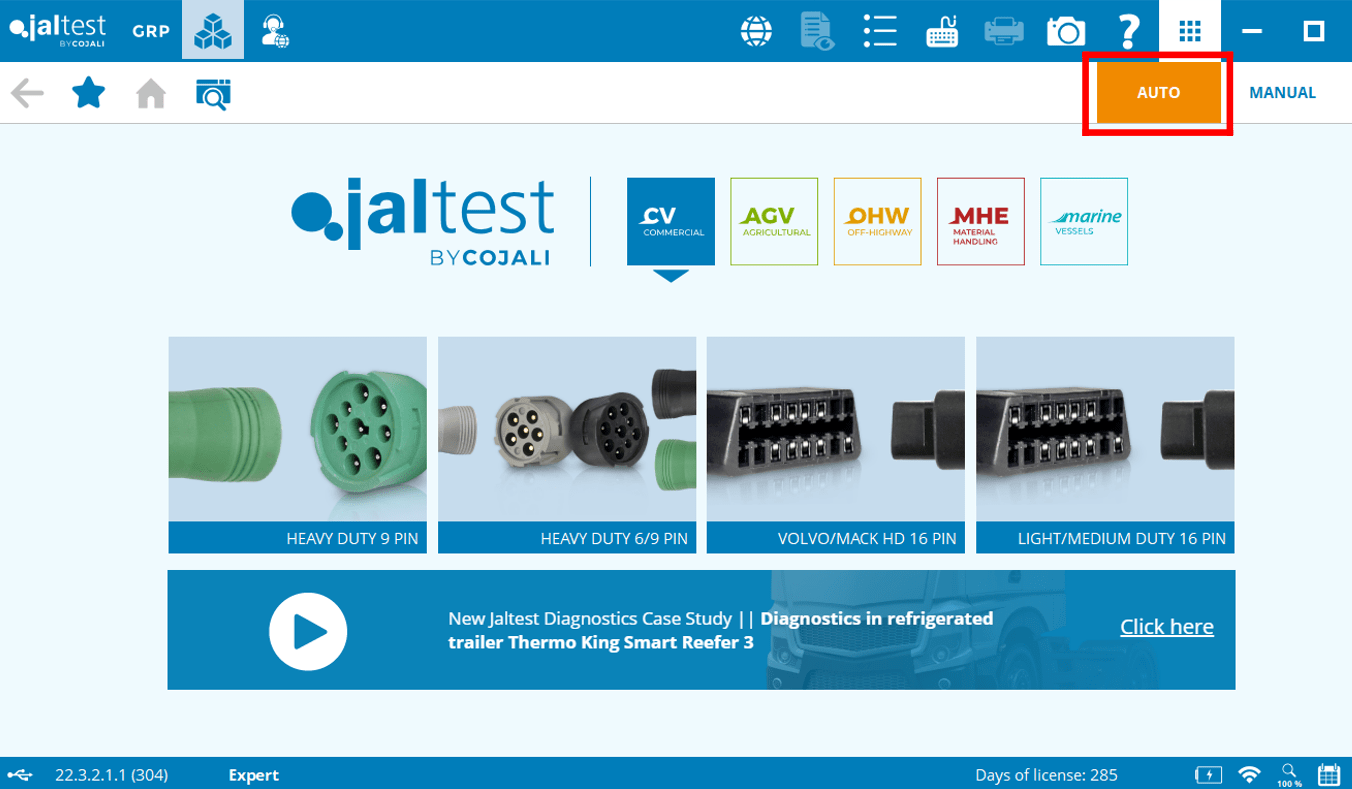
The scan buttons on your main screen cover all commercial vehicles, from Class 3 and up, including Class 6-8 trucks.
Jaltest Auto Scan is a feature of the Jaltest CV module that allows technicians to quickly and accurately scan a vehicle's electronic systems to identify systems and any fault codes that may be present.
With Jaltest Auto Scan, technicians can access and analyze data from various electronic control modules (ECMs) in a vehicle, including the engine control module (ECM), transmission control module (TCM), brake control module (BCM), and others. This helps technicians to diagnose and fix problems more efficiently and effectively, leading to faster repairs and reduced downtime for the vehicle.
MANUAL CONNECTION
In manual connection mode, the technician selects the specific make and model for the truck they are working on. Then, they connect the appropriate cables or connectors to the vehicle's diagnostic port and to the Jaltest diagnostic tool. This allows the tool to communicate with the vehicle's electronic systems and retrieve data for analysis and troubleshooting.
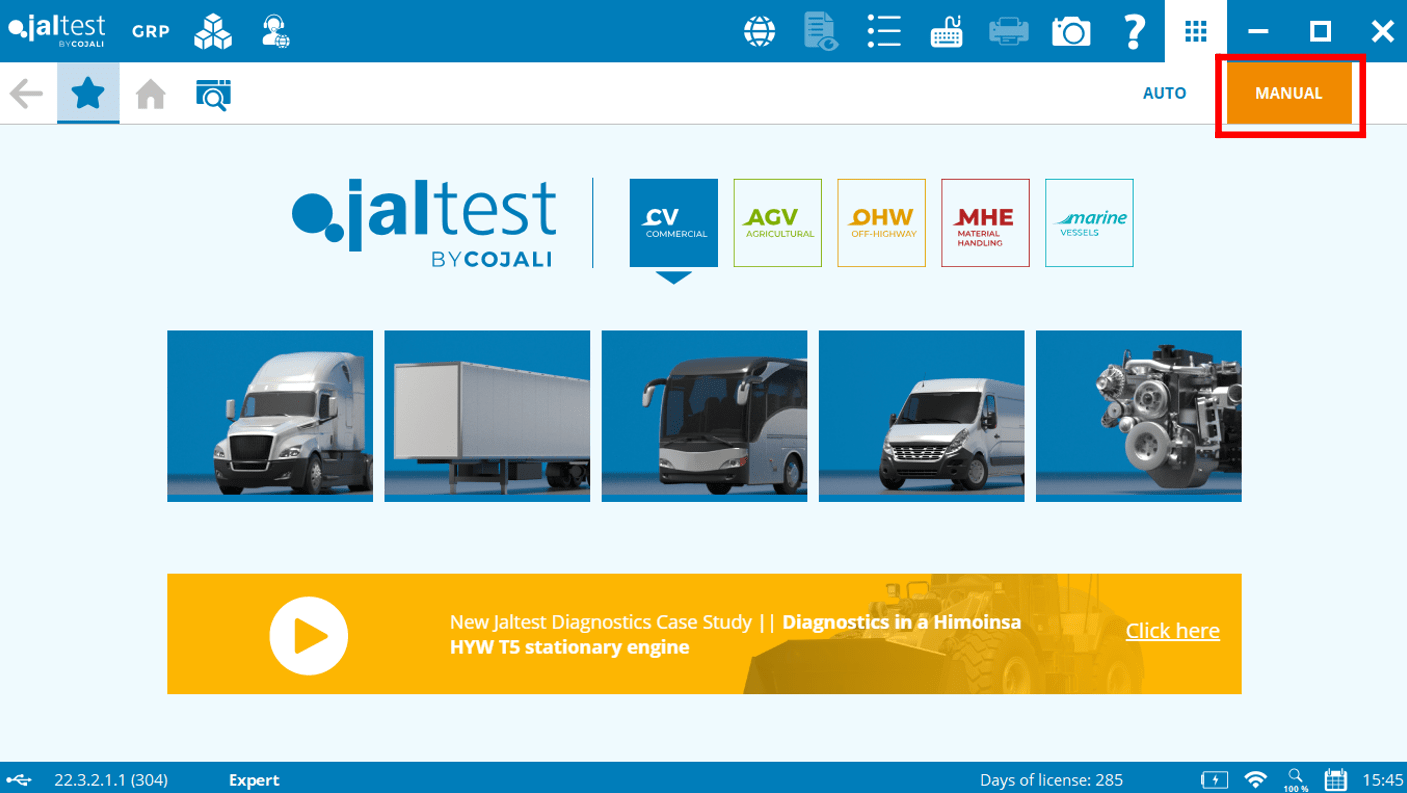

See the pictures below to know how to run a COMMUNICATIONS TEST in Jaltest.
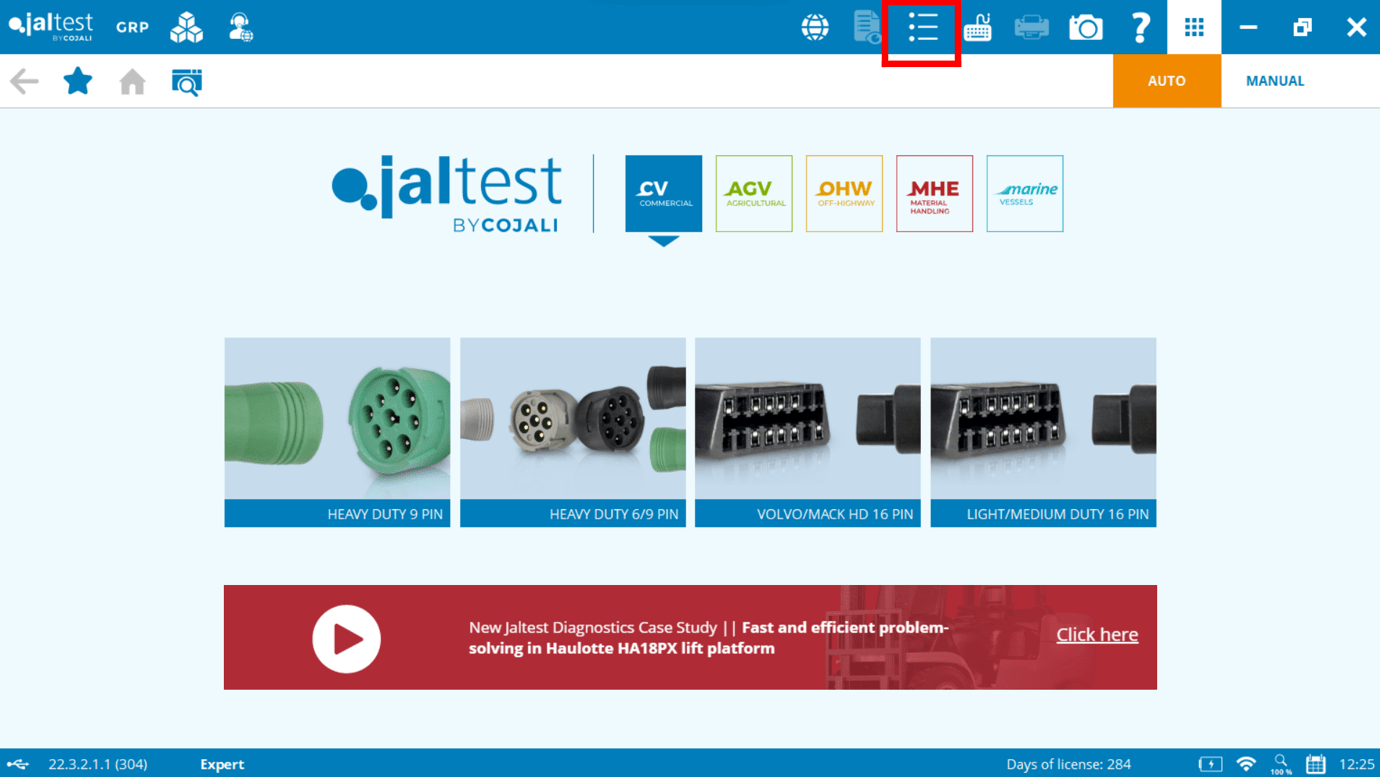
1. Access the Preferences Menu and click "Jaltest link".

2. Verify you have the proper voltage from the vehicle (12V/ 24V). Make sure your vehicle provides enough voltage to power the system.
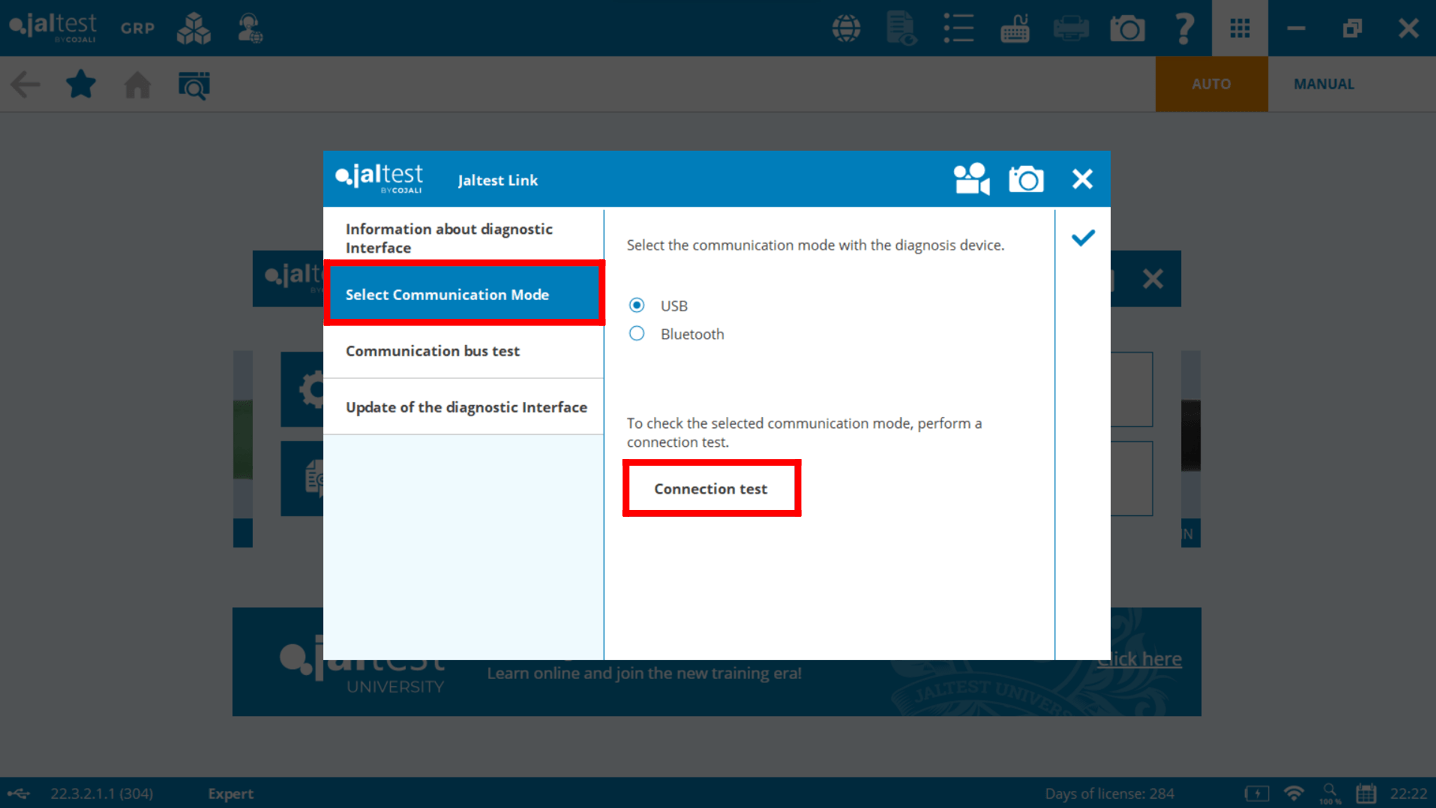
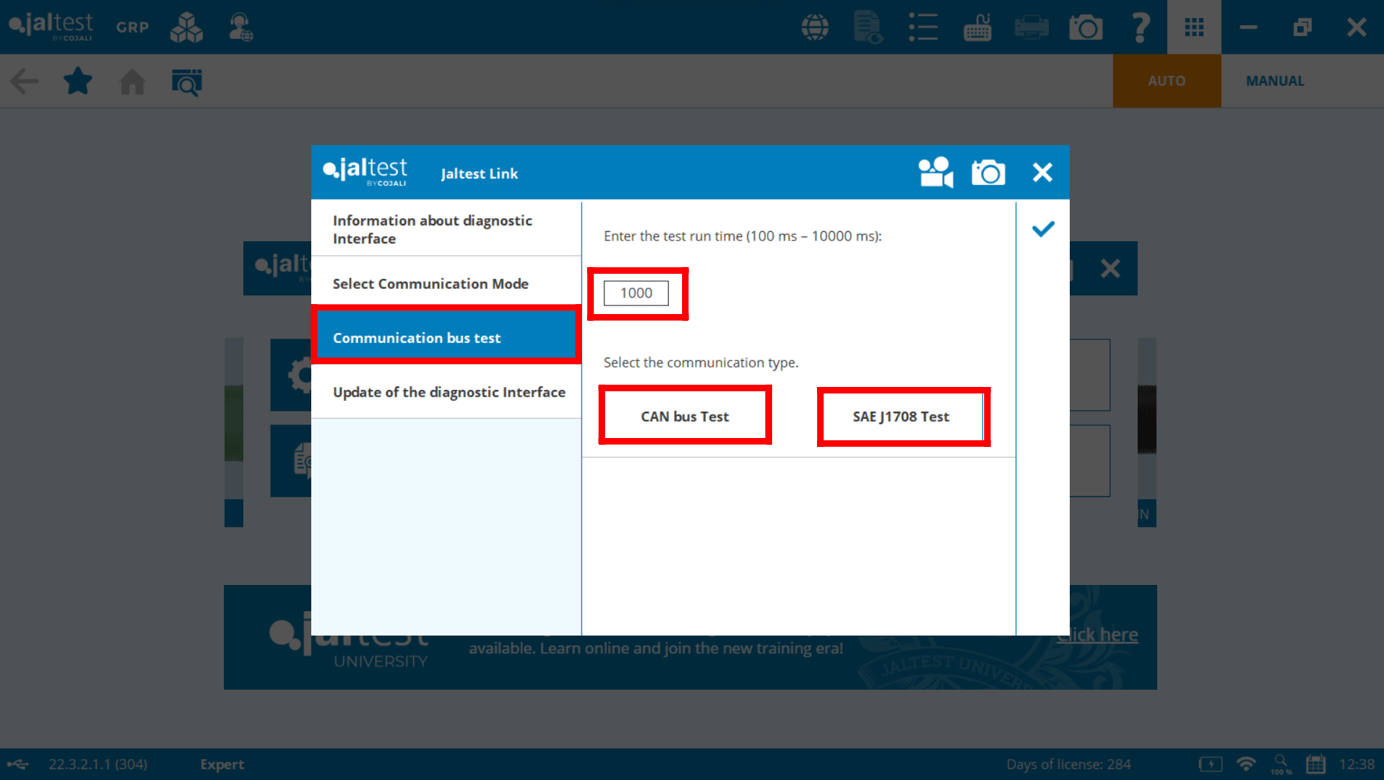
3. Select Communication bus test, enter the run test time, and select the communication type (Can Bus test, SAE J1708 test)
If the problem persists, contact customer support at (305) 960-7651 or email us at customersupport@jaltest.com.

If you believe your product has an issue covered under warranty, you can submit a claim easily. Visit our Warranty Claim page to fill out the form. Our team will review your request and assist you promptly.
